Sunday, November 30, 2008

Stampin' Up! Gift Giving Guide

Are you stuck for gift ideas for your crafty friends and family? Stampin' Up! has put together some gift giving ideas to make the pre-Christmas crazy time a little less stressful. Simply take a look at the flyer (click the picture to the left for a close up) and contact me to place your order. What could be easier?

Come back to visit my blog tomorrow for some more great news!

Saturday, November 29, 2008

Stop Press!!

The Marker Promotion has been extended for an additional 14 days! Yes, apparently it has been so successful that Stampin' Up! have decided to extend it so everyone can get a chance to buy the individual markers they want. So check out that list again and send me your order today!

Click on the picture to the left to see the promotion on the Stampin' Up! website, or click here to see the flyer up close.

Thursday, November 27, 2008

100 Cards ... continued

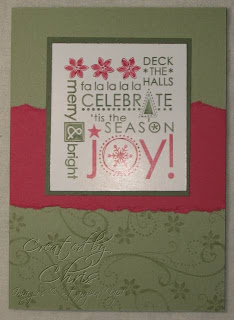
Okay, because Blogger refused to cooperate the other day, I couldn't upload a close up of one of the cards I made for work. Rather than scratch my head over it all, I have taken the easy way out and scanned a card for you to see. The colours have come out kind of odd, but that is an issue with the scanner and the expanse of white on the card - something else I am not going to fuss about just now *g*.

Anyway, here it is ... a simple design, easy to mass produce (unless you're like me and accidentally stick a few card fronts on backwards *sigh* - my excuse is it was getting a little late and I was socialising at the time instead of paying attention to what I was doing) yet effective.

I'm gonna miss this stamp set *sniffle*. Only a couple more days to go if you want to buy it!

Images © 1990-2008 Stampin' Up!®. Contact me if you wish to order any of the supplies used to make this card.

Supplies used:

Stamp sets: Season of Joy
Ink: Purely Pomegranate, Wild Wasabi

Cardstock: Wild Wasabi, Purely Pomegranate, Whisper White

Other: 1-1/4" Circle Punch, 1-3/8" Circle Punch, Scallop Circle Punch, 3/16" Corner Rounder punch

Wednesday, November 26, 2008

100 Christmas Cards!

You can imagine how happy I was to get this lot finished! Yep, there are 100 cards in that pile.

I'm quite impressed with myself.

The backstory to this is that when I started at my current place of employment, my friend (who coincidentally is the office manager) told the boss I made handmade cards. The next thing I know, I've volunteered myself to make the Christmas cards to send to our customers.

That was 2004, and our customer base has grown somewhat since then, but now it's become something of a tradition that our cards are handmade.

I hope the customers like these ones. I do (but not quite as much as I did before I made 100 of them *g*).

I've been trying to post a closeup of one of the cards, but Blogger isn't playing nicely today and keeps wanting to insert the picture vertically instead of horizontally, no matter how I try to trick it! So I will keep trying to get that sorted, and in the meantime, the card is very similar to the second card in this post, except instead of cutting out the flower, I punched out a round design (in the interests of speed).

Images © 1990-2008 Stampin' Up!®. Contact me if you wish to order any of the supplies used to make this card.

Supplies used:

Stamp sets: Season of Joy
Ink: Purely Pomegranate, Wild Wasabi

Cardstock: Wild Wasabi, Purely Pomegranate, Whisper White

Other: 1-1/4" Circle Punch, 1-3/8" Circle Punch, Scallop Circle Punch, 3/16" Corner Rounder punch

Tuesday, November 25, 2008

Don't Miss Out!

Just a quick heads up ... there is only a few more days to take advantage of some great offers from Stampin' Up!

You only have until November 30 to order individual markers, or take advantage of the "spend $20, get 20% off" offer on rubons (click on the links to see the details of these promotions)

Not to mention the Spring Mini ... you won't be able to order any of the goodies in there after the end of November!

I am going to miss Always, not to mention One of a Kind and Season of Joy (that last one is the stamp set that just keeps on giving - ideas, that is. Trust me, I haven't posted half the cards I've made with those Christmas stamps).

Don't be kicking yourself if you miss out! Please contact me early to place your order, as I can't guarantee orders placed after November 29th (allowing for computer glitches and payment issues).

Sunday, November 23, 2008

Just playing

Sometimes it's hard to find the motivation to stamp, so when you do you have to make the most of it. The weather in Melbourne this weekend has been what can only be described as average (well, less than average at times) so I dragged out some stamps to see what I could come up with.

Sadly I can't show you some of my new creations! But with the new Summer Mini catalogue due for release on December 1, you don't have too much longer to wait before I can post samples. I can't wait to show you - you're gonna love it!

But for now, let's take a look at an old favourite which I've been revisiting lately - Baroque Motifs. I saw a card somewhere made with these colours and thought I would give it a go - warm colours aren't something I'm usually comfortable with, but the sample was so pretty I had to try.

Here I have stamped the swirl onto white gloss card with Versamark, then clear embossed. After it cooled, I brayered So Saffron all over the white, and sponged Pumpkin Pie around the edges.

I used the Rock n Roll technique on the floral medallion stamp, and as a finishing touch I tarted up a brad with some Dazzling Diamonds glitter (this is so easy - attach a glue dot to the head of the brad - they're exactly the right size! - and dip in glitter!). Here's a closeup ...

This whole thing looks pretty cool in real life - you can believe that I patted myself on the back when I was finished!

Images © 1990-2008 Stampin' Up!®. Contact me if you wish to order any of the supplies used to make this card.

Supplies used:

Stamp sets: Baroque Motifs
Ink: Old Olive, Pumpkin Pie, So Saffron, Versamark

Cardstock: Whisper White, Gloss White Cardstock, So Saffron, Old Olive, Pumpkin Pie

Other: Designer Label Punch, Small Oval Punch, Clear Stampin' Emboss Powder, Vintage Brads (black), Mini Glue Dots, Dazzling Diamonds, Stampin' Sponge

Tuesday, November 18, 2008

Christmas Inspiration

I was blurfing (yes, of course you know what that means ... you're doing it now! Blog surfing, that is) earlier and decided to visit the very talented Marelle Taylor's blog over at thINKspot. Her stuff is simply gorgeous *sigh*. Anyway, I was taken by the card on this post and, because I am actually supposed to be doing something completely different, ended up making this instead.

This is just so easy it's almost embarrassing *g*.

I have a small stash of old copper coins and 1c pieces are the exact right size for this technique. Once I run out of 1c bits, the cards will become 8c dearer to make after I switch to using 5c pieces.

I wonder if I could churn a few of these out for my family Christmas cards this year ...? These spinner cards are so much fun to play with, almost hypnotic. Try one and see!

Images © 1990-2008 Stampin' Up!®. Contact me if you wish to order any of the supplies used to make this card.

Supplies used:

Stamp sets: Baroque Motifs, Party Punch (hostess)
Ink: Old Olive, Real Red

Cardstock: Whisper White, Old Olive, Real Red

Other: Word Window Punch, 1/2" Circle Punch, 1" Circle Punch, 1-1/4" Circle Punch, Scallop Circle Punch, Scallope Edge Punch

Saturday, November 15, 2008

'Tis the Season

Since we are in the middle of a fabulous marker promotion, I thought I would use my markers to create another Christmas card using my new favourite Christmas set, Season of Joy (and don't forget that this set is only available until the end of November!)

Here I have used Always Artichoke and Rose Red to colour in the stamp, which kind of highlights certain parts of the stamp.

It's very simple to do ... as the Stampin' Write markers are double ended, simply use the brush tip to colour in - but don't forget to use the *side* of the marker, not the tip - it will give you faster coverage and not damage the tip too much.

Given that colouring the stamp is a little slower than inking with a regular pad, you will find that parts of the image will dry off a little while you're finishing the rest. To remoisten the ink, just give a little "huff" on the stamp - you feel like a bit of a dill, but hold the stamp up to your mouth and huff some warm air onto it. It really does work.

This technique can also be used to omit parts of a design, but you have to make sure your stamp is superclean before you start or you will end up with nasty little ghost images where you don't want them. Yes, I know this from experience *sigh*.

PS do you like my new watermark? I got tired of the old one and decided to make a pretty one. Variety, as they say, is the spice of life *g*.

Images © 1990-2008 Stampin' Up!®

Supplies used:

Stamp sets: Season of Joy
Ink: Mellow Moss

Cardstock: Gloss White, Always Artichoke, Rose Red, Mellow Moss

Other: Stampin' Write Markers in Rose Red and Always Artichoke

Wednesday, November 12, 2008

Always playing about

I keep finding new reasons to love this stamp set ... this time it's shrink plastic. Yes, I know, not something that Stampin' Up! sell, but it was so much fun I had to share with you!

I found some shrink plastic that I bought a while back and decided to have a play - but the thing with this stuff is that ... well, it shrinks. You need to use an image that is a decent size to start off with as the finished product will be around a third of the original size. And that's where the heart from Always comes in - it measures about 6cm from top to bottom so makes a good sized charm when shrunk.

So how did I do this? I simply stamped the heart onto the shrink plastic with Stazon (carefully so as not to smudge the ink), trimmed it as neatly as possible, punched a hole in at the top (very important to do this *before* you shrink) and blasted the plastic with my heat gun while it curled and contorted and finally shrunk to its finished size.

When the plastic has finished shrinking the piece will be considerably thicker than it was at the start, and sturdy enough to make fun jewellery from. I decided not to colour these earrings, but I could have used coloured Sharpies. And because I have been known to suffer allergic reactions to jewellery findings I just used some jump rings and made a chain to hang the hearts from my (non allergenic) sleepers.

A reminder that this particular set is from the Stampin' Up! Spring Mini Catalogue and as such, is only available until the end of this month ... if you have been thinking about buying it but kept putting it off, I would hate for you to miss out! Contact me to place your order today!

Images © 1990-2008 Stampin' Up

Supplies used:

Stamp sets: Always
Ink: Stazon

Other: Cropadile
The stamped heart uses Purely Pomegrate ink on Whisper White cardstock, and Pretty in Pink ink on Pretty in Pink cardstock.

Monday, November 10, 2008

The birthday celebrations continue!

Yes, Stampin' Up! is *still* celebrating its 20th birthday and we're still getting the presents *g*.

This month, from November 10-30 there are two promotions running.

Firstly:

Being Single Never Looked So Good

From November 10 to 30, you get to do something that has never been available from Stampin' Up! Australia before ... buy Stampin' Write Markers individually! If you have been looking at the markers and wanting to try them but were a bit daunted by the price or not knowing how to use them, for the next 20 days you can buy just one or two of your favourite colours to try out!

Click on the picture to the left to see the promotion on the Stampin' Up! website, or click here to see the flyer up close.

I have a couple of packs of these markers, and have to say that they really are lovely to use. They are double ended, with a fine tip at one end for writing and detailed colouring, and a brush tip at the other end which is perfect for using "direct to rubber". Personally, I will be lashing out on a few to replace my absolute favourite colours - not because they are running out, but just in case *g*.

I hope to have a project or two up over the next few days to inspire you.

Secondly:

Rub On Some Happiness

During the same period (November 10-30), when you spend $20 on any catalogue merchandise, you can buy any of the rubons for 20% off! This means that instead of costing you $19.95, you can get a pack for only $15.96. The rubons come with tons of images which coordinate with Stampin' Up! stamp sets and Designer Papers, and have a sheet each of white and black rubons in each pack.

These are perfect for scrapbooking and cardmaking, but can also be used on glass, tin, plastic or ribbons as well. There are probably way more uses that I haven't found, but I know you'll have fun trying them!

Click on the picture to have a closer look at the flyer for this promotion.

Contact me today to take advantage of these two great offers!

Images © 2008 Stampin' Up!®

Sunday, November 9, 2008

Melbourne Regional Seminar

Yesterday over 100 Stampin' Up! demonstrators congregated at the Melbourne Convention Centre for our regional training seminar. These days are invaluable as a way to learn new techniques and business information as well as mingle with other demonstrators (usually from our own state, but often from interstate as well).

At the seminar we listened to various speakers and watched demonstrations from both local and international guests. We also got to make some projects ourselves, using stamp sets and cardstock packets which were included in our admission price. I wish I could show you what we made, but until December 1 I can't reveal the stamp set we used, because it isn't available until that date through the Summer Mini Catalogue.

So watch this space for more information on that.

Another feature of these get togethers is something that the stamping world (not just Stampin' Up!) has been doing for some time - swaps. It's not mandatory, but many demonstrators make card fronts specially to swap with other demonstrators - it is a good way to see new and different techniques and styles and to build up our sample boards and boxes so customers can see more than just the things we personally create.

I was lucky enough to swap with some very talented ladies (and one gentleman - waves to Martyn!) and would like to share a picture of the results with you.

Many thanks to (in no particular order): Felicity Gray, Gail Kirby, Janine Rawlins, Sheila Chilingsworth, Melanie Dunstan, Caville Ogden, Jo Eades, Christine Healey, Jenny Myerscough, Bron Alleyn, Nikki Holmes, Danielle Scholz, Bec Guerra, Jacinta Ryan, Bridget Larsen, Teresa Brown, Melissa Roos, Martyn Munro

There were of course many others swapping, sadly I wasn't quick enough and came home with a few of my own.

It was a great day, and a reminder about just why I do what I do - not only is it a lot of fun to create your own little works of art, it is even more fun to share it with other people who "get" the whole thing.

If you would like to join the fun, why not email me to find out more about joining my little team? We'd love to have you along!

Images © 1990-2008 Stampin' Up!®

Thursday, November 6, 2008

Samples from a workshop

I thought I would share a couple of cards which were made during workshops in October. The hostesses were hoping to get a head start on Christmas cards and with my faithful Season of Joy stamp set I was ready to help out!

As I've said before, this is a really useful set to have if you are making your own cards, because there are enough stamps in there to get quite a few completely different looks without using the same images over and over again.

Firstly is this little card ... I wanted to use colours which were a little left of centre from the traditional red and green, and thought that pink and olive (with vanilla) fit the bill nicely.

I teamed Season of Joy with the So Swirly wheel because they work together so well.

Images © 1990-2008 Stampin' Up

Supplies used:

Stamp sets: Season of Joy
Ink: Old Olive

Cardstock: Pretty in Pink, Old Olive, Purely Pomegranate, Very Vanilla

Other:
1-3/8" Circle Punch, 1-1/4" Circle Punch, So Swirly Stampin' Around Jumbo Wheel, Jumbo Stampin ' Around Handle, Pretty in Pink 1/4" Grosgrain Ribbon

The other card we made is the basis for those 80 cards I have to make for work (which apparently are increasing to 100 ... *sigh* ...). Of course, the mass-produced one is a bit less fiddly in terms of cutting out, but still effective - trust me. You'll see what I mean when I finish them.

Here the flower (I guess it's supposed to be a poinsettia?) has been trimmed and layered onto the green circle then the red scallop. It's a little time consuming but worth the effort when you see the finished card.

I used Purely Pomegranate and Wild Wasabi here as the traditional Christmas red and green with a twist - they look gorgeous together.

Images © 1990-2008 Stampin' Up!®

Supplies used:

Stamp sets: Season of Joy
Ink: Purely Pomegranate, Wild Wasabi

Cardstock: Wild Wasabi, Purely Pomegranate, Whisper White

Other: 1-3/8" Circle Punch, Scallop Circle Punch, 3/16" Corner Rounder punch

Don't forget!! This stamp set (along with all the others in the current Spring Mini) is only available until the end of this month! I would hate for you to miss out, so consider this a friendly reminder *g*. Contact me today!

Saturday, November 1, 2008

Mmmm, cake ...

Something a little different today, and so easy to do! This is a card I demo'd at a workshop a while back, to show how easy it is to produce a multi-coloured effect using Stampin' Write markers.

As you can see from the photo, the cake and stand are actually one stamp - of course you would normally prefer the stand to be a different colour, which is where the markers come in so handy. They are double ended, with one end being a fine point for writing, and the other a brush tip for colouring either a stamped image, or the stamp itself.

I have coloured directly onto the rubber for both the cake and stand as well as the sparklers on top.

Images © 1990-2008 Stampin' Up!®

Supplies used:

Stamp sets: Eat Cake
Ink: Rose Red
Cardstock: So Saffron, Bordering Blue, Rose Red

Other: Rose Red and So Saffron Stampin' Write Markers, Stampamajig

LinkWithin

Related Posts with Thumbnails