Showing posts with label Priceless. Show all posts

Saturday, December 5, 2009

Stampin on Candles

I have to admit, the title of this post is something of a misnomer - but it's the easiest way of describing this technique.

You don't literally stamp "on" the candle, rather you stamp onto white tissue paper (the cheap gift wrapping kind), then use your heat gun to fuse it gently into the wax.

The result is effective and yes, you can still burn the candles, although I would recommend removing any paper, ribbon or "bling" that may be attached.

I was inspired by the lovely Simone Bartrum's presentation on "candle stamping" at the recent Melbourne regional Stampin' Up! seminar (as was just about everyone else in the room). She showed us some simply stunning projects using ideas I had never thought of before - check out her blog, she is super-talented.

Images © 1990-2009 Stampin' Up!®

Supplies used:

Stamp/s: Always, Priceless, Live Like You Mean It, Season of Joy
Ink: Regal Rose, Chocolate Chip, Real Red, Not Quite Navy

Other: Sweet Always DSP, 1/4" White Grosgrain Ribbon, Old Olive Stampin' Write Marker

Friday, October 30, 2009

Little boxes

I was blog-hopping recently, and stopped by Jackie Topa's blog (she is amazing). One of her projects seemed so simple yet effective I had to try it straight away, and here is the result (yes, I know the photo is a bit dark - I was sick when I took the photo and didn't have the energy to sort it out).

The box is a little bit smaller than her version, at only 3-1/2 inches square rather than 4. This made it a good fit for the little 3 inch square gift cards I whipped up to put inside. As you can see, I've used my current favourite colour combination of Apricot Appeal and Pixie Pink here (I tried to get some Real Red in, but it just didn't want to happen).

After I took the photos, I decided to bling it up a little by adding glitter to the butterfly's body and the tiny flower on the wing - so cute!

Images © 1990-2009 Stampin' Up!®

Supplies used:

Stamp set/s: Priceless
Ink: Apricot Appeal, Pixie Pink

Cardstock: Apricot Appeal, Pixie Pink, Whisper White

Other: So Swirly Stampin' Around Jumbo Wheel, 1-1/4" Circle Punch, 1-3/8" Circle Punch, Scallop Circle Punch, Apricot Appeal 1/4" Grosgrain Ribbon

Here's close ups of each element of this little gift set.

Monday, October 20, 2008

Just messing about ...

... with Priceless yet again. I will have to make myself use other stamps soon. I picked up a couple of little shelving units on the weekend to store my Stampin' Up! sets in, so they are a little more accessible - hopefully this will cure me of using the same stamps over and over.

Then again, this kind of thing has never worked in the past, I can see no reason for it to start now *g*.

I know that this card was inspired by one seen ... somewhere ... whoever you are, I apologise for not attaching credit, but it was a great idea and ended up being a very nice card.

Sadly you probably can't see the sparkly glitter I stuck to some parts of the swirl ... take my word for it, it does look pretty.

Images © 1990-2008 Stampin' Up!®

Supplies used:

Stamp sets: Priceless
Ink: More Mustard, Ruby Red, Not Quite Navy, Whisper White
Cardstock: More Mustard, Ruby Red, Whisper White, Not Quite Navy

Other: So Swirly Stampin' Around Jumbo Wheel, Dazzling Diamonds, Stampin' Dimensionals, Stampin' Sponges

Friday, October 17, 2008

Pretty Priceless

I just love this stamp set. And these colours (you've probably already noticed that). The pale Pretty in Pink contrasts really well with the strong Not Quite Navy and Purely Pomegranate. It's pretty hard to make a dud card with this set, although I have managed it *g*. Not that I will be posting any of my failures, you don't need to see those!

Images © 1990-2008 Stampin' Up!®

Supplies used:

Stamp sets: Priceless
Ink: Not Quite Navy, Purely Pomegranate
Cardstock: Pretty in Pink, Not Quite Navy, Whisper White

Other: Word Window Punch, So Swirly Stampin' Around Jumbo Wheel, Stampin' Around Jumbo Handle, Stampin' Dimensionals

Saturday, October 4, 2008

Happy Birthday!

My sister in law's birthday is coming up (waves to Sophie) so of course I have to make her a card ... well, I have all this cardstock and ink just laying about, you know?

This took me simply ages, not because it was particularly complex, but just because I couldn't get my head around how I wanted it to look. And pink wasn't my first choice but it just looked right (after many misguided attempts early on with different colours). In the end I had to call in my emergency backup (DD and DS) who critiqued what I had done and advised me (correctly, as it happens) just what was wrong with what I was doing and what I should do instead.

So I did.

Kids are handy like that.

Images © 1990-2008 Stampin' Up!®

Supplies used:

Stamp sets: Priceless, One of a Kind
Ink: Pretty in Pink, Purely Pomegranate, Basic Black
Cardstock: Pretty in Pink, Purely Pomegranate, Whisper White, Basic Black

Other: Large Oval Punch, Small Oval Punch, Stampin' Sponges, Stampin' Dimensionals, 1/4" Whisper White Grosgrain Ribbon, Basic Black Marker

Tuesday, September 30, 2008

Pretty Butterflies

I have to admit ... this one is not an original idea of mine :-( but I wish it was! The layout was so pretty I just had to make one of my own with similar colours, because the soft blue, green and purple combination was too lovely to resist.

You can see the original here - I liked the white on white look but ended up going with Bashful Blue as a base colour instead.

I am so glad I finally got around to buying this stamp set for myself - it's just so pretty and swirly *g*. I can see myself getting a lot of use out of this one!

Images © 1990-2008 Stampin' Up!®

Supplies used:

Stamp sets: Priceless
Ink: Sage Shadow, Bashful Blue, Perfect Plum
Cardstock: Bashful Blue, Perfect Plum, Whisper White

Other: So Swirly Stampin' Around Wheel, Stampin' Around Jumbo Handle, Whisper White 1/4" Grosgrain Ribbon, Stampin' Dimensionals

Saturday, September 20, 2008

Waterfall card

I learnt how to make these a few years back, then promptly forgot how to ... my very first effort is still kicking about somewhere, I think. Anyway, I thought it was time to make another one, as they're fun to play with *g*.

You pull the tab at the bottom and the pictures flip over. Rather than using pictures as shown here, you could use words in to reveal a message as the tab is pulled. A message can also be stamped/written on the tab itself.

How fortunate for me that this set (Priceless) comes with four images just the right size for this kind of treatment *g*. And (warning: shameless plug ahead) if you buy Priceless this month you can get the matching So Swirly wheel absolutely free! Contact me today!

Images © 1990-2008 Stampin' Up!®

Supplies used:

Stamp sets: Priceless
Ink: Rose Red, So Saffron
Cardstock: Mellow Moss, So Saffron, Rose Red, Whisper White

Other: So Swirly Jumbo Stampin' Around Wheel, Jumbo Handle, Cropadile, eyelets

Tuesday, September 9, 2008

River Rock

I'm rediscovering this great colour ... by itself it doesn't look like much but once you pair it with different colours it really grows on you!

First up is a card using one of the stamp set/wheel combinations you could buy with this month's promotion - the set is Priceless and the wheel is called So Swirly. Buy Priceless and get So Swirly for free, but only for September! Contact me today! (sorry, just had to get a plug in there *g*).

I loooove this set and this wheel.

I've combined River Rock with Purely Pomegranate just because I love these two together. Sorry the pic is a little dark, I was in a hurry.

Images © 1990-2008 Stampin' Up!®

Supplies used:

Stamp sets: Priceless
Ink: Purely Pomegranate, River Rock

Cardstock: River Rock, Purely Pomegranate, Whisper White

Other: So Swirly Stampin' Around Jumbo Wheel & Handle, 1-3/8" Circle Punch, Stampin' Dimensionals

The second card was mostly made to see what River Rock looked like with Perfect Plum and Pale Plum - I think it works. I wish you could see this card in person - it is a spinner card and so much fun to play with! You hold the card almost upright then tilt it from side to side and watch the circular element spin down the slot and back again.

Once you get the hang of making spinner cards, they take about 10 minutes to put together, then you get an hour of fun playing with them LOL.

Just a quick note ... if you are going to make one of these, I would suggest using a Word Window punch rather than cutting the slot yourself as shown in the instructions in the link. Much quicker and less frustration for all concerned. Simply push the punch in as far as it will go, punch once about an inch in from one side, then slide along and punch again. Also, use two Dimensionals on top of each other to lift the main layer away from the backing, in order to give the spinner plenty of room at the back to do its thing.

Images © 1990-2008 Stampin' Up!®

Supplies used:

Stamp sets: Always
Ink: Perfect Plum, Pale Plum, River Rock

Cardstock: River Rock, Perfect Plum, Whisper White

Other: Word Window Punch, Scallop Punch, 1-3/8" Circle Punch, 1-1/4" Circle Punch, Stampin' Dimensionals, Stamp-A-Ma-Jig, Paper Piercing tool

Saturday, June 28, 2008

More pink ...

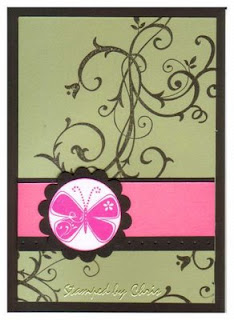
I tried really hard today to *not* make a pink card, but it just happened that way. I think my mistake was to use green in the first place - it goes so well with pink. Next time I think I will start with a different colour and see what direction it takes me in.

Every month I try to get to our local "stamp club" (well, when I say "local", it's more of a 20 minute drive). This club has been going in various forms for over 10 years now, and is a nice way to get out of the house for the afternoon and see what other people are doing. Half the time I don't get any stamping done, but just chat and look at what everyone else is doing.

Lately I have been trying to be a bit more focussed, however, and here is the results.

[CASEing alert (surely you've seen this acronym before? It means Copy And Steal Everything - but in the nicest possible way, or at least that's how I use it). These ideas aren't mine, but I can't recall where I saw them originally. If you think your card might have been the inspiration for one of these and you don't think I should have it up, please let me know.]

The colours are a little odd on this one, although I tried to alter the hue and saturation somewhat so it looked a little more like the card itself. It does look a little more vibrant in real life. Look, there's that butterfly from Priceless yet again!

I don't know if you can see the row of holes pierced along the bottom of the black panel, just a bit of visual interest and texture there.

Images © 1990-2008 Stampin' Up!®

Supplies used: Baroque Motifs and Priceless
stamp sets, Pretty in Pink, Mellow Moss, Pink Passion, Basic Black and Whisper White cardstock, Pink Passion and Basic Black ink, Paper Piercing tool and Mat Pack, Scallop Punch, 1-3/8" Circle Punch.


I like how this one came out, and it was pretty simple to do. See how the swirl from Baroque Motifs looks like some sort of bramble or wilderness of weeds? Wish I could say I'd thought of that myself.

The trickiest part of this was doing the butterfly's antennae - I inked it up, then used my finger to wipe away the pink on just that part and then inked that bit up with the tip of my black marker. A little fiddly, but well worth it.

Images © 1990-2008 Stampin' Up!®

Supplies used: Baroque Motifs, Priceless and Warm Words
stamp sets, Regal Rose, Old Olive and Whisper White cardstock, Regal Rose and Old Olive ink, Basic Black Marker

Okay, now with any luck I'm over this pink phase for a while. Let's see what I come up with for next time! I'm always surprised at the end of a stamping session, because I usually have no idea what I'm going to end up with - the best laid ideas which looked fabulous in my head are never the same when they're glued down in cardstock, and generally need a tweak or two before I'm happy.

Sunday, June 22, 2008

Thank You card

Last night I went to a friend's house to stamp. There is a group of us who have been having these get togethers every month or so for some years now, and it is a great way to have a girls' night, catch up, have a few laughs and occasionally get something creative done.

Usually I have no idea what I want to make, and take just about everything I can fit into my travelling workshop (and given that I have just upgraded to a new improved model, that is a heck of a lot, trust me). Last night I had half an idea and still took too much. But I got some stuff made!

First card is not my idea at all - I used a design from the Stampin' Up! website, and made only two changes - I used a different stamp set and used an eyelet rather than a brad. It came out exactly like it was supposed to.

Can you see the row of embossed dots above the circle punch? These are done with the Crop-A-Dile! Yep, not only does it punch holes and set eyelets like a dream, you can do these nifty little raised dots with it as well! I like the look, plan to use it a lot more *g*.

(Note that I scanned this so it's a little dodgy - given that it has a little dimension due to the ribbon, I would have preferred to photograph it but didn't think of it till now when it's far too dark to do. Hopefully I will remember to fix this tomorrow).

Images © 1990-2008 Stampin' Up!®

Supplies used: Seeing Spots
and Happiness stamp sets, Pretty in Pink, Whisper White and Old Olive cardstock, Pretty in Pink and Old Olive inks, Pretty in Pink and Old Olive Stampin' Write markers, 1-3/8" Circle Punch, 1-1/4" Circle Punch, 3/4" Punch Real Red ribbon, Crop-a-dile, Whisper White 1/4" Grosgrain Ribbon

The other card I made was totally inspired by a card in the Ideas Book & Catalogue (page 105). I don't own this set (Priceless) but my friend/upline (Gail) let me use hers, as she knows how much I love it. Here it is with my "go to" colour combination of So Saffron, Purely Pomegranate and Mellow Moss. The butterfly was inked with So Saffron, then I carefully rolled the edges of its wings in the Purely Pomegranate.

Again, I would have preferred to photograph this rather than scan it, as then you would see how the butterfly's wings aren't stuck down and sit a little away from the base card.

Images © 1990-2008 Stampin' Up!®

Supplies used: Priceless stamp set,
So Saffron, Purely Pomegranate and Mellow Moss cardstock, So Saffron, Purely Pomegranate, Mellow Moss and Basic Black inks, Basic Black Stampin' Write marker, Piercing Tool, Mat Pack, Photo Corners Punch

LinkWithin

Related Posts with Thumbnails