Showing posts with label Designer Series Paper. Show all posts

Wednesday, January 6, 2010

Happy New Year!

Another Christmas has passed, and we can all breathe freely for a little while at least ... while I enjoyed the break, there seems to be a ridiculous amount of pressure attached to Christmas - sorry, just got a little "bah humbug" there *g*.

Anyway, it's now 2010, and so far it's looking like a good year. Then again, it is only the 6th, plenty of time for things to go wrong LOL.

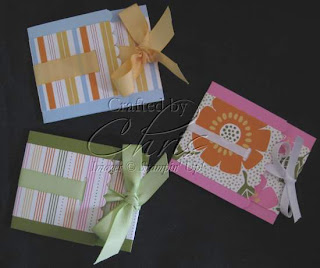
To kick off this year's posts, here is a snap of little gift card holders I whipped up for my nieces and nephew on Christmas Eve (nothing like the last minute for getting things done!). We usually find gift cards or cash are easiest, that way the kids can get whatever they want rather than end up with something lame that Auntie Chris picked up for them.

So each year I try to come up with a smart packaging idea. I was going to make little handbags, but that probably would have annoyed my nephew no end LOL, so after a little research online came up with these little beauties. And do you think I can remember where I got the idea from? Of course not!

Basically, these holders are a strip of cardstock, scored twice, with one side stuck down to create a little pocket. I stuck a piece of white cardstock under the top flap to write my message on.

And look! I've even cut into my precious stash of Designer Series Paper to decorate these - no stamping involved!

Images © 1990-2009 Stampin' Up!®

Supplies used:

Cardstock: Bashful Blue, Old Olive, Pixie Pink

Other: Washington Apple DSP, Petal Party Simply Scrappin' Kit, 1/4" White Grosgrain Ribbon, 5/8" So Saffron and Certainly Celery ribbons from September promo (no longer available, sorry), Horizontal Slot Punch, Scallop Edge Punch

Friday, November 20, 2009

Sneak Peek - Summer Mini

Isn't this just so cute? The upcoming Summer Mini catalogue (contact me if you'd like a copy) has some gorgeous stuff, not the least of which is this cool butterfly punch and matching stamp set. The punch will also co-ordinate with a stamp set in the main catalogue (Flight of the Butterfly).

In retrospect, when making this card I should have stamped the vellum overlay as well as the pink layer, as you can't actually see what the butterfly stamps look like (doh!). That's my next project *g*.

The bodies of the butterflies are made by wrapping a strand of gold embroidery thread around the middle and knotting it at the top to create antennae.

Do you like the patterned paper down the side? This is from the Patterns Pack, only available as a hostess benefit (ie. with a workshop or order over $300). The pack contains 60 6' square sheets of double-sided patterned paper - 2 sheets of six designs in five different colours (including Regal Rose shown here) not available as regular DSP.

The biggest problem with the gorgeous double-sided patterned paper? Trying to decide which side to use!

Images © 1990-2009 Stampin' Up!®

Supplies used:

Stamp/s: Butterfly Prints
Ink: Pretty in Pink

Cardstock: Pink Pirouette, Regal Rose, Vellum Card
Other: Patterns Pack II Designer Series Paper, Butterfly Punch

Wednesday, October 28, 2009

Always

A couple of weeks ago I was in need of a quick, easy and impressive card for a workshop I was doing (waves to Sue). While surfing around the net, I stumbled across this gorgeous card and was immediately inspired.

We were going to be using Stampin' Pastels at the workshop, so I used the heart stamp from Always to demonstrate a technique known as "poppin' pastels", where you stamp in Versamark and then dust over the image with chalks - the chalk sticks to the Versamarked image, but not so much to the cardstock surrounding it, giving a subtle and soft finish.

This is the card we made. And look! I actually cut into my precious stash of Designer Series Paper (this particular piece is from the collection known as "Sweet Always" which coincidentally matches the stamp set Always). We used the colours in the paper scrap to carry over to the chalked heart, that is Regal Rose and Pumpkin Pie.

One of the guests chose to use the other side of the DSP (all SU DSPs are double-sided, and come with two sheets of six designs per packet), which was a gorgeous look as the reverse of this striped piece is pink with a white floral design similar to that on the heart.

Images © 1990-2009 Stampin' Up!®

Supplies used:

Stamp set/s: Always, Best Yet
Ink: Versamark, Regal Rose

Cardstock: Regal Rose, Pink Pirouette, Whisper White

Other: Stampin' Pastels, Sweet Always Designer Series Paper, Eyelet Border Punch, Wide Oval Punch, Large Oval Punch

While I was fluffing about trying to decide on the card the workshop guests would make, I did a few other variations, mostly to show different looks for the same layout using assorted techniques.

The first of this group is pretty much the same card, however rather than stamping with Versamark then chalking over the top, I chose to ink the stamp with the Versamark and then colour directly onto the (now sticky) rubber with the chalks, then stamp.

This gives a soft effect but more crisp than that achieved with the "poppin' pastels" technique.

Images © 1990-2009 Stampin' Up!®

Supplies used:

Stamp set/s: Always, Sho
rt & Sweet
Ink: Versamark, Regal Rose

Cardstock: Regal Rose, Pink Pirouette, Whisper White

Other: Stampin' Pastels, Eyelet Border Punch, Wide Oval Punch, Large Oval Punch, Small Oval Punch

The next card uses the same techniqe on the heart, however with this one I also used the matching Always in Bloom wheel in Whisper White ink across the top of the base card to provide some depth.

A tip for seamless coverage when using a wheel - roll it across the cardstock diagonally. This camouflages the joins a little and looks more natural.

Images © 1990-2009 Stampin' Up!®

Supplies used:


Stamp set/s: Always, Upsy Daisy
Ink: Versamark, Regal Rose, Whisper White

Cardstock: Regal Rose, Pink Pirouette, Whisper White

Other: Stampin' Pastels, Eyelet Border Punch, Always in Bloom Standard Wheel, Wide Oval Punch, Large Oval Punch, Small Oval Punch

The last is my favourite - this time I ditched the pastels altogether and went for sparkly! The heart is inked first in Versamark, then directly into Regal Rose before stamping. This means you can utilise the stickyness of Versamark and the colour of the dye ink to create coloured embossing and glittering effects.

I used Heat & Stick powder and Dazzling Diamonds (I wish you could see it in real life) to sparkle up the heart, then before assembly used the Always in Bloom wheel and Whisper White craft ink to create a very subtle pattern on the Pink Pirouette cardstock. The Pink Pirouette is so pale you can barely see the white ink, but it really makes the card pop.

Images © 1990-2009 Stampin' Up!®

Supplies used:


Stamp set/s: Always, Best Yet
Ink: Versamark, Regal Rose, Whisper White

Cardstock: Regal Rose, Pink Pirouette, Whisper White

Other: Eyelet Border Punch, Always in Bloom Standard Wheel, Heat & Stick Powder, Dazzling Diamonds Glitter, Designer Label Punch, 1-1/4" Circle Punch
Thursday, September 10, 2009

Tri-Shutter Card

There seems to be a lot of samples lately of a style of card known as the Tri-Shutter (for reasons which become obvious as you play with one of these). I finally got around to making my own version recently, and have to say I'm pretty pleased with how it came out.

These cards are really not that hard to make. I used the instructions found here, modified slightly to suit an A4 piece of cardstock. So long as your score lines are evenly spaced, with an interval in the middle twice the size of the outside folds (that makes no sense written down like that, but if you follow the instructions you'll see what I mean), it should work just fine.

And they're fun to decorate. Here I've used the Designer Series Paper "Sweet Always" as the inspiration for the colour scheme and stamp set - Regal Rose, Chocolate Chip and Pumpkin Pie is perhaps not a colour combination you would consider in the normal scheme of things, but it really does work as you can see.

I have a little more work to do on the inside of the card, but it looks so darned pretty as it is I don't want to mess it up *g*.

And here's a shot of the card from above, so you can see how it stands and get an idea of how it all folds together to fit in a regular C6 sized envelope.

Images © 1990-2009 Stampin' Up!®

Supplies used:

Stamp set/s: Always

Ink: Regal Rose, Chocolate Chip, Pumpkin Pie
Cardstock: Regal Rose, Whisper White

Other: 1/2" Circle Punch. Sweet Always Designer Series Paper

Wednesday, July 15, 2009

Neverending Card

Have you seen a neverending card? They are so easy to make but provide hours (or at least minutes) of fun for the recipient and pretty much anyone else who is about at the time.

Recently, a few of the Gailforce girls visited Felicity, who showed us how to make one of these nifty neverending cards. It was a little tricky working out which panels went where so that they were all up the right way with each turn of the card, but once it's done you get quite a feeling of achievement *g*. And you've got something to play with LOL.

I do still have a little work to do on this card, colouring in and such, but I thought I would share it in it's "unfinished" state.

If you would like to learn how to make one, contact me - I'm sure I could work out some sort of a class to suit you!


Images © 1990-2009 Stampin' Up!®

Supplies used:

Stamp set/s: Party Hearty, Crazy for Cupcakes

Ink: Rose Red, Old Olive, Tempting Turquoise, Lovely Lilac
Cardstock: Basic Black, Whisper White, Tempting Turquoise, Rose Red, Old Olive
Other: Bali Breeze Designer Series Paper (retired)

LinkWithin

Related Posts with Thumbnails