Friday, December 23, 2011

A Cardstock Comparison

I'm sure I've posted about this before, but I can't for the life of me recall where it ended up.  Anyway, it bears repeating.

The other day, when I was making my Christmas cards, I was hunting for my stash of Whisper White cardstock (yes, it usually lives in the one place, but I was getting low and thought I might have some squirreled away elsewhere).  I found a handful of white cardstock and naturally assumed it was what I was looking for.

I couldn't have been more wrong, as I discovered when I started to stamp.

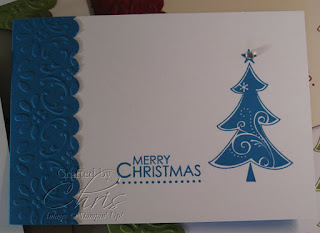
Can you see the difference in the picture?

The El Cheapo cardstock is on the left.  The cardstock itself looks very similar to Stampin' Up! Whisper White, but the ink just doesn't soak into the card the same way it does with the SU sample shown on the right.  You can see how patchy the tree looks, especially around the large swirl.


The Whisper White (and Very Vanilla) cardstock from Stampin' Up! have a smooth, smooth, smooth finish which takes ink beautifully.  You might be able to get away with a cheaper card if you are using outline stamps (although, why compromise?), but for bold stamps with large inked areas, you honestly can't go past this stuff.  If you are at all fussy about the finished look of your cards and scrapbooking pages, I can't recommend this highly enough.

You will be pleased to know that I found my hidden cache of Whisper White (and ordered another packet just in case) and my Christmas cards are ink-perfect :-)

Images © 1990-2011 Stampin' Up!®

Supplies used:

Stamp/s: Season of Joy
Ink: Rich Razzleberry

Cardstock: Whisper White, and some cheap stuff I had lying around

Tuesday, December 20, 2011

Countdown to Christmas

With only a few days to go, I thought I had better share my Christmas cards for 2011 ... those of you who saw my previous post will recognise this instantly LOL.  Yes, I CASEd myself again this year - it was hard enough coming up with one design I could mass produce, why would I want to try to think of another?

Actually, I did have another idea, but that never really took off - I decided I was trying too hard, and the finished results didn't look ... well, finished.  I might revisit the idea through the year, however - we'll see how keen I get.

As with the cards I made for my employers, I trimmed each edge with the Scallop Border Punch, and embossed them using the Finial Press Embossing Folder.  This time I used my time-saving tip of putting two through the folder at a time from the start ... you may be able to tell from this closeup that the embossed design doesn't look quite as crisp as you would normally expect - this card uses the bottom of the two embossed sheets.

To dress up the cards a little, I spritzed the front flap with a little of my home made shimmer spray (ie. a few drops of Champagne Mist Shimmer Paint in a little spray bottle with some rubbing alcohol) - it looks pretty and smells nice too!

Images © 1990-2011 Stampin' Up!®

Supplies used:

Stamp/s: Season of Joy
Ink: Rich Razzleberry

Cardstock: Rich Razzleberry, Whisper White
Other: Scallop Edge Border Punch, Finial Press Embossing Folder, Basic Rhinestones, Champagne Frost Shimmer Paint

Saturday, December 17, 2011

Christmas Cards Galore!

Ho, ho, ho.

That's about as merry as it gets around here at this time of year.  I find myself not feeling terribly Christmassy until the very last minute (although for a wonder I have actually finished all the gift buying early - I know, I couldn't believe it either!).

Each year, I have been asked by my employers to make handmade cards to send out to our customers.  It's only a small company, but that's still in excess of 100 cards - *phew*.  I almost didn't do it this year, as I was a little burnt out after making 100 of these (which I really liked, but not after the first forty or so).  But at the last minute I remembered that our customers have enjoyed these cards in the past, they have come to kind of expect it, and I get paid for my efforts :-)

So without further ado, here is this year's effort.  This isn't all the cards - but you get the idea.  As you can see, I've revisited an old favourite, Season of Joy - still available in this year's catalogue (but sure to retire next year).  It really is a great set, with enough stamps to create quite a variety of looks.  I added a rhinestone to the star of each, just for a little extra "wow".

 I made some in Old Olive, some in Pacific Point, and some in Cherry Cobbler (however I teamed the Cherry ones with Very Vanilla rather than Whisper White - love the "vintage" look those to have when they're together.

The cards were a snap to make ... I quickly worked out that I could get three bases out of a sheet of A4 by cutting two 19 x 10.5cm strips from one end, then flipping it 90 degrees and trimming the remaining piece down to 19 x 10.5cm.  Each strip was then scored at 14.8cm, leaving a 4.2cm flap for the front.  Then I just stuck A6 pieces of Whisper White or Very Vanilla behind the (decorated) flaps.

And here is a closeup of one of the cards.  As you can see, I used my Scallop Edge punch down the edge of the flap, and dressed it up by embossing that section with the Finial Press Embossing Folder.  After a time I realised I could put two pieces through the Big Shot at a time - the second piece wasn't embossed quite as deeply, but looked perfect anyway.  Unfortunately, I didn't work this out until I was on the last 18 or so LOL.


Anyway, they all went out in the mail on Friday, and I have already had a couple of comments from the customers - feedback is a wonderful thing!

And in case you're wondering, here are links to Christmas 2009's cards for work, and 2008's as well.  Next year I'm going to start early.  No, honest.

Images © 1990-2011 Stampin' Up!®

Supplies used:

Stamp/s: Season of Joy
Ink: Old Olive, Pacific Point, Cherry Cobbler

Cardstock: Old Olive, Pacific Point, Cherry Cobbler, Whisper White, Very Vanilla
Other: Scallop Edge Border Punch, Finial Press Embossing Folder, Basic Rhinestones

Friday, December 16, 2011

An update


Yes, I know it's over 2 weeks since I posted ... it's been hard to get a look-in on my own computer lately, since 18yo DS got Skyrim and this is the one computer in the house that has enough RAM to run it.  Tonight I have asked him nicely to let me have a turn :-)


I wanted to give you a quick update on the December Frenzy sale ... due to limited supply, the set Every Moment has been returned to its normal price (ie. $31.95).

Thursday, December 1, 2011

New Summer Mini Catalogue 2011-12

One more quick post and then it's time for bed...


From December 1 2011 through to March 31 2012, you can purchase items from the new Summer Mini Catalogue.  There's lots of new stamps, papers, ribbons and even a couple of punches (look out for projects starring the new 1" square punch and the coordinating postage stamp punch!).

Email me if you would like a copy of the Mini for yourself (or you can check it out online if you prefer), or if you would like to place an order for one or more of the new toys inside :-)

December Frenzy!


Hello?  I know you're out there ... sorry it's been a few weeks since my last update, November turned out to be quite a bit busier than I had expected for everything except stamping.  But I have to take a few moments to share the December promotion with you, because it's a beauty :-)

During December  2011, you can get up to 50% off a selection of amazing products.  There are a couple here which I am definitely going to be buying myself for Christmas (hey, it's the only way of being sure I will like what I get LOL).


Item Page Description Discount Retail  Price Sale Price
120597 22 Welcome Christmas Clear-Mount Set 50% $39.95 $19.98
121584 22 Welcome Christmas Wood-Mount Set 50% $49.95 $24.98
117715 28 I {Heart} Hearts Wood-Mount Set 40% $42.95 $25.77
121528 35 Got Treats Wood-Mount Set 40% $40.95 $24.57
117699 42 Something Sweet Wood-Mount Set 40% $44.95 $26.97
116686 46 For Everything Wood-Mount Set 40% $47.95 $28.77
119163 67 Cottage Garden Wood-Mount Set 50% $32.95 $16.48
121508 72 Every Moment Wood-Mount Set 40% $31.95 $19.17
121480 74 Awash with Flowers Wood-Mount Set 40% $71.95 $43.17
121522 75 Friends Never Fade Wood-Mount Set 50% $31.95 $15.98
120618 75 Friends Never Fade Clear-Mount Set 40% $25.95 $15.57
121600 75 Ornate Blossom Wood-Mount Set 40% $19.95 $11.97
123551 88 Clearly For You Wood-Mount Set 40% $47.95 $28.77
123848 96 Chloe Stampin Around Builder Wheel 40% $9.95 $5.97
116911 126 Padded Envelopes (3) 40% $6.50 $3.90
119263 138 Poppy Parade 1/2'' Stitched-Poly Ribbon 30% $16.95 $11.87
119267 138 Blushing Bride 1/2'' Stitched-Poly Ribbon 30% $16.95 $11.87
119731 143 Regals Flower Brads 30% $16.95 $11.87
119730 143 Neutrals Flower Brads 30% $16.95 $11.87
118762 146 Distressing Essentials 30% $37.95 $26.57
103179 149 Craft & Rubber Scissors 30% $37.95 $26.57
112531 149 Circle Scissor Plus Glass Mat 30% $37.95 $26.57

So contact me today to place your order and take advantage of these bargains!


Wednesday, November 9, 2011

Those Colours Again

Last time I showed you a card made with a somewhat eye-popping colour combination ... well, I didn't stop with just one, oh no, not me.

How do you like this?

Again I have used Pumpkin Pie, Lucky Limeade, Rich Razzleberry and Early Espresso but aside from the greeting, there is no stamping involved - I just let the cardstock and my awesome new Fun Flowers Bigz L Die do the work for me.

The closeup here shows the detail of the new Stripes Embossing Folder, which I used on a strip of Lucky Limeade across the bottom of the card for a bit of fun.

Images © 1990-2011 Stampin' Up!®

Supplies used:

Stamps: Teeny Tiny Sentiments
Ink: Early Espresso
Cardstock: Lucky Limeade, Early Espresso, Rich Razzleberry, Pumpkin Pie, Whisper White

Other:Stripes Embossing Folder, Fun Flowers Bigz L Die, 3/4" Circle Punch, Itty Bitty Shapes Punch, 2-1/2" Circle Punch

Sunday, November 6, 2011

Trying out Colours

Here's a colour combination I found a little challenging.  I used the ColourQ site again, and picked these as colours I would use but hadn't put together before ... it was quite interesting to work outside my comfort zone with these.

So, do Pumpkin Pie, Lucky Limeade, Rich Razzleberry and Early Espresso work together?  I think the answer is "yes".  Who would have thought it?  Certainly not me!

And I am really liking this Hostess Set, "Array of Sunshine" - I love big bold flower stamps - it makes for a lot of colour with very little effort, just my kind of stamping :-)

 Hey, and check out this bow ... so neat and tidy and such a CHEAT *g*.  It is actually a "fork bow", glued over the top of a piece of ribbon wrapped around the back of the strip of stamped Whisper White cardstock.  I discovered these awesome instructions, and just tied the bow around my fingers rather than a fork for a slightly larger bow.

Images © 1990-2011 Stampin' Up!®

Supplies used:

Stamps: Array of Sunshine
Ink: Pumpkin Pie, Lucky Limeade, Rich Razzleberry
Cardstock: Early Espresso, Lucky Limeade, Whisper White

Other:Crimper, Eyelet Border Punch, Rich Razzleberry 1/4" Grosgrain Ribbon

Thursday, November 3, 2011

A Sale to "Die" for


During November, you can purchase selected Big Shot dies and embossing folders for 10% off!  No minimum requirements, no other purchase necessary - take a look at this list of special prices:


Page
Item Description Retail Price 10% Off Price
156 117332 Scalloped Heart of Hearts Embosslits Die $21.95 $19.75
156 114515 Flower Burst Embosslits Die $21.95 $19.75
157 114517 Manhattan Flower Textured Impressions Embossing Folder $14.95 $13.45
157 116824 Petals-a-Plenty Textured Impressions Embossing Folder $14.95 $13.45
157 119277 Elegant Lines Textured Impressions Embossing Folder $14.95 $13.45
158 113440 Buttons #5 Sizzlits Die $9.95 $8.95
159 113466 Pillow Box Bigz Die $36.95 $33.25
159 114507 Beautiful Butterflies Bigz Die $39.95 $35.95
159 120903 Scallop Square Duo Bigz Die $39.95 $35.95
160 115953 Mover & Shapers Punch Windows $54.95 $49.45
160 120893 Tasteful Trim Bigz XL Die $69.95 $62.95
160 121810 Petal Cone Bigz L Die $59.95 $53.95

If you don't own a Big Shot, November might well be the month to buy one, as you can also buy the following Big Shot Bundle at 10% off the regular price:


Page Description Retail Value 10% Off Price Item
155
Big Shot Die-Cutting Machine
$186.85 $168.16 128944
156 Scalloped Heart of Hearts Embosslits Die
157 Manhattan Flower Textured Impressions Embossing Folder

I own a lot of Big Shot stuff myself, but I can see a few things on the list that I still have to buy :-)

You can see the flyer over at my Stampin' Up! website, then give me a call or drop me an email to arrange your order.

Sunday, October 23, 2011

Stocking Horse

How cute is this idea?  I was looking for inspiration for my new stamps (the Stitched Stockings set, currently available this month as a "preview" set from the upcoming Summer Mini Catalogue - click this link to find out more) and stumbled across this nifty "out of the box" use.  So who says stockings are just for Christmas?

I also got a chance to christen my new Houndstooth Embossing Folder ... :-)

Images © 1990-2011 Stampin' Up!®

Supplies used:

Stamps: Stitched Stockings, Woodgrain. Short & Sweet
Ink: Island Indigo
Cardstock: Lucky Limeade, Daffodil Delight, Island Indigo, Soft Suede, Whisper White

Other:Houndstooth Embossing Folder, Daffodil Delight 1/4" Grosgrain Ribbon, 3/4" Circle Punch, Stocking Tag Builder Punch, 1-1/2" Circle Punch, 2-3/8" Scallop Circle Punch, 1-3/4" Scallop Circle Punch, 1-3/8" Circle Punch

Wednesday, October 19, 2011

Inspired by ... myself!

A week or so ago I posted a card I was particularly happy with, using the Creative Elements set.  I liked it so much I made it again to send to my darling sister-in-law (waves to Sophie) for her birthday, but this time I paired my new favourite colours Pool Party and Island Indigo.

Oh, and everything goes with Crumb Cake.  I can't recommend this "colour" highly enough.

To bling this up just a little, I added a weeny little half-pearl from the Basic Pearls set (note to self - get a pair of fine-nosed tweezers to handle these ones - the medium and large sized ones are fine, but the tiny little ones are insanely small).  It fits perfectly at the centre of the design on the butterfly's body.

Images © 1990-2011 Stampin' Up!®

Supplies used:

 Stamps: Creative Elements 
Ink: Pool Party, Island Indigo, Crumb CakeCardstock: Crumb Cake, Island Indigo, Pool Party, Very Vanilla

Other:Basic Black Stampin' Write Marker, 1-3/4" Circle, Scallop Trim Border Punch, Vintage Wallpaper Embossing Folder, Basic Pearls


Sunday, October 16, 2011

Array of Sunshine

 New rubber!  Yay!  Finally got around to placing an order from the new 2011-12 Catalogue, and so I have some new stuff to play with (*sigh* when I get time).

This is one of the new hostess sets ... for a workshop or order of $300 or more, you could choose this stamp set (and more!) for your very own.

I was inspired by this post at ColourQ (I can't believe it's taken me this long to discover this blog full of great inspiration!) - don't these colours look stunning together?  Okay, I had to change out their suggestion of Crushed Curry (what an odd name for a colour) because this was never released in Australia, but Daffodil Delight looks just as nice, I think.

I have to admit, there was a LOT of work cutting this thing out, but when you're half watching telly the time goes by fairly quickly.  And the result was totally worth it, I'm sure you agree.

Do you think it needs a greeting?  Perhaps I'll leave that until I decide what to do with it ...

Images © 1990-2011 Stampin' Up!®

Supplies used:

 Stamps: Array of Sunshine (Hostess Set)
Ink: Pumpkin Pie, Island Indigo, Lucky Limeade, Daffodil Delight
Cardstock: Daffodil Delight, Island Indigo, Whisper White


Monday, October 10, 2011

Vintage Violet

I have been drawn to making softer, more "vintage" style cards lately, although sadly I don't really have much in the way of current Stampin' Up! supplies to do this with (better rectify that - there are some lovely "olde worlde" styles in the current 2011-12 catalogue).

Fortunately one of the stamp sets we received at the Stampin' Up! Convention back in May was Creative Elements, which has 8 decorative, collage-y style stamps you can mix and match for the perfect vintage look.

I've used Wisteria Wonder again (with a touch of Concord Crush) and teamed it with Crumb Cake - because just about everything looks good with Crumb Cake.  The butterfly was inked with Wisteria Wonder, then I used my Basic Black marker to colour the body and rolled just the edges of the stamp onto my Concord Crush inkpad to shade the wings a little.

And here's a closeup of the butterfly and flower.  As you can probably imagine, it took more than a little time to cut around the petals of that flower, but I like to think the effect (popped up on Dimensionals) is totally worth it :-)


Images © 1990-2011 Stampin' Up!®


Supplies used:

 Stamps: Creative Elements 
Ink: Wisteria Wonder, Crumb Cake, Concord Crush 
Cardstock: Crumb Cake, Concord Crush, Wisteria Wonder, Very Vanilla
Other:Basic Black Stampin' Write Marker, 1-3/4" Circle, Scallop Trim Border Punch, Vintage Wallpaper Embossing Folder


Friday, October 7, 2011

Pretty Purples

Have you had a close look at the new 2011-12 In Colors yet?  Those of you who have been mourning the loss of a pale purple might be pleased to know there is now a shade called Wisteria Wonder.  It may not be able to replace Pale Plum (nothing ever will *sob*) but it does look gorgeous when teamed with Concord Crush as shown here.

I have heard it said that Wisteria Wonder is a little "grey" - while this is kind of true, I think it all depends on what colour you're matching it with.  Having said that, the colours shown in the sample here are really not at all true to life - you would really need to see it in person to appreciate it :-)

Images © 1990-2011 Stampin' Up!®

Supplies used:
Stamps: Cottage Garden
Ink: Wisteria Wonder
Cardstock: Wisteria Wonder, Daffodil Delight, Concord Crush, Whisper White
Other:Scallop Edge Punch, Perfect Polka Dots Embossing Folder

Sunday, October 2, 2011

Simply Stockings


During the month of October, you can purchase or earn an exclusive preview stamp set and coordinating punch.  The cute Stitched Stockings set is available in clear-mount or wood-mount, and is designed to be mix-and-matched with the Stocking Tag builder punch.  I have already seen some adorable samples using this set, and now you have the opportunity to purchase it before it's official release in the Summer Mini Catalogue later this year.

Read a little more about this promotion and see what the stamps and punch look like over at my Stampin' Up! website.  Remember, this pre-order offer is only available from October 1 to 31!

Thursday, September 15, 2011

More Owling About


I'm still having a little fun with the Owl Builder punch.  This card is a little more straightforward than the last two - no tricks, no fancy stuff, just the owl as he was meant to be.

I have also discovered a colour scheme I'm particularly happy with :-)  Look how pretty Pool Party and Island Indigo are with Poppy Parade!  Fresh and clean and just downright happy!


Images © 1990-2011 Stampin' Up!®

Supplies used:
Stamps: Teeny Tiny Sentiments
Ink: Island Indigo
Cardstock: Pool Party, Island Indigo, Poppy Parade, Whisper White, Chocolate Chip
 Other:1-3/4" Circle Punch, 2-3/8" Scallop Circle Punch, Owl Builder Punch, Decorative Label Punch, Large Oval Punch, Word Window Punch, Perfect Polka Dots Embossing Folder

Monday, September 12, 2011

Welcome Sheep

Every time I look at this little guy's face, I have to smile :-)

Further to my post the other day about cranking out a few ideas with my owl punch, I came across this little gem.  Too easy!  The sheep took about five minutes to make (well, possibly six by the time I glued the teeny-tiny pupils onto the eyes), then another half an hour to decide on his background.


Images © 1990-2011 Stampin' Up!®

Supplies used:
Ink: Marina Mist
Cardstock: Daffodil Delight, Marina Mist, Whisper White, Basic Black
 Other: 2-3/8" Scallop Circle Punch, Owl Builder Punch, Word Window Punch, Boho  Blossoms Punch, Marina Mist 1/4" Grosgrain Ribbon, Elegant Lines Embossing Folder, Crimper

Friday, September 9, 2011

Owl Love :-)

The other day I realised that my Owl Punch hadn't been getting much love lately, so out it came for a play.  After a bit of a look around on the web I felt inspired enough to make this little beauty ... I love it so much, just wish I'd thought of it independently *g*.

The original inspiration is here ... you can see that I've tweaked the idea a little.  The "sky" layer is a piece of Pink Pirouette cardstock, which I sponged in layers using Pink Pirouette, Peach Parfait and Melon Mambo ink in an effort to replicate an evening sky.  The card itself came out a very vibrant and warm colour which doesn't really come through in these photographs.

I used the "inlaid embossing" technique to embed the word into the top layer - I always get a buzz out of seeing how it ends up looking almost like it was printed directly onto the cardstock.  The large large heart from the Heart To Heart punch fits well in place of the "v" as you can see.

I'm loving the Timeless Type Sizzix alphabet - it's exactly the right size to use for short words on a cardfront.

Images © 1990-2011 Stampin' Up!®

Supplies used:
Ink: Pink Pirouette, Peach Parfait, Melon Mambo
Cardstock: Basic Black, Whisper White, Pink Pirouette
 Other: 1-3/4" Circle Punch, Heart to Heart Punch, Owl Builder Punch, Bird Builder Punch, Timeless Type Junior Alphabet Sizzlit Dies, Square Lattice Embossing Folder

Tuesday, September 6, 2011

Heart to Heart

Just something I whipped up the other day.

I tore some pages out of a secondhand book on music history I picked up for just such a purpose many years ago, and over-stamped and sponged them in Cherry Cobbler ink to tie the layers together.

The beauty of using layers like this is that you can use them to hide mistakes, like the one you can't see here - in the original design, two hearts (punched out of the book pages) were stuck directly to the gray layer.  However, the paper was pretty flimsy and once the glue was on them they pretty much decided what they were going to do, and it wasn't what I wanted LOL.  Naturally, this was after everything had already been stuck down (you'd think I would have learned by now) so another layer of paper and some red punched hearts instead and ... here you are!

Images © 1990-2011 Stampin' Up!®

Supplies used:
Stamp(s): Creative Elements
Ink: Basic Black, Cherry Cobbler, Basic Gray
 
Cardstock: Basic Black, Cherry Cobbler, Basic Gray
Other: Full Heart Punch

Saturday, September 3, 2011

Button Buddies

 Have you had a chance to check out the new 2011-12 Idea Book & Catalogue yet?  How fun is it?!

And speaking of fun, here's a little card made using a new set Button Buddies (see page 47).  Attendees at the Melbourne Convention in May were lucky enough to receive this set for FREE (my favourite kind), and I have been hanging out to share it with you all.

The stamps are designed to coordinate with Stampin' Up!'s Designer Buttons, and as you can see, this little guy's nose would be the perfect place (if I had any of the buttons, that is).

I like the colour combination here - something a little "out there" compared to my usual safe bets.  I've used Wild Wasabi as the base, layered with Daffodil Delight and Rich Razzleberry, with the pig and punched shape in Blushing Bride.

And here's a closeup of the punched greeting layer ... gotta love this Decorative Label punch!  It goes with everything!

Supplies used:Stamp(s): Button Buddies, Party This Way
Ink: Blushing Bride, Rich Razzleberry

 Cardstock: Wild Wasabi, Daffodil Delight, Rich Razzleberry, Blushing Bride
Other: Large Oval Punch, Decorative Label Punch, Perfect Polka Dots Embossing Folder, Crimper, retired ribbon

Thursday, September 1, 2011

OMG! New Catalogue!


Yes, the moment you've all been waiting for!  The new 2011-12 Idea Book &  Catalogue is now live and ready for you to have a look for some new favourite products.

Click the picture above or here to take a look.

One thing I'm particularly happy about is the drop in price for many of the Big Shot items - take a look at pages 155-161 and see things like exclusive embossing folders now only $14.95, or the Big Shot itself for under $150!  My aim this year is to complete my collection of Big Shot goodies, as I just can't get enough of the die cut goodness :-)

So drop me an email if you'd like to have your own copy of the 2011-12 Idea Book &  Catalogue for $10, or to find out how to get one for FREE.

Join for Just $169!


Have you ever thought about becoming a Stampin' Up! demonstrator?  Well, during the month of September, for the bargain price of only $169, you could!

For a limited time only, you can purchase a mini Starter Kit, valued at over $310, for only $169 and discover the benefits of belonging to the Stampin' Up! family.  Or, if you prefer, you can purchase the full Starter Kit ($610 value) at a discount of 20% off the original price of $289 (ie. $231.20).

Either choice is excellent value, and whichever you choose, you can start to take advantage of everything Stampin' Up! have to offer their growing family of demonstrators.  We get a discount on purchases, sneak peeks at new catalogue merchandise, pre-order periods on catalogues, special bonus product with certain promotions and access to a wonderful community of like-minded people all happy to chat and share!

So contact me today to discuss this great opportunity!  I'd love to give you more information!

(and don't think I've forgotten ... my next post will be all about the NEW CATALOGUE!)

Tuesday, August 30, 2011

Last Chance at the Last Chance List!

Just a reminder that there is only ONE MORE DAY TO GO of the 2010-11 Idea Book & Catalogue. That means this is your last chance to purchase retiring items (those that haven't already sold out, that is). Last orders are taken tomorrow, August 31, 2011.

Take a quick look at the list on my Google Docs page or download a PDF copy from my webpage. The sold out items are marked so you can quickly see if you still have a chance at your favourites :-)

And keep your eyes peeled ... I will be posting links to the NEW 2011-12 catalogue in all its glory on Thursday, September 1.

Thursday, August 25, 2011

UFOs

The bane of the crafter - well, probably any hobbyist, really - the UnFinished Objects that clutter up your workspace.

The other night I picked up one of the many UFOs I have tucked away (no wonder they're unfinished - out of sight, out of mind!) and actually converted it to a Finished Object.

The fact that it looks nothing like the original prototype is neither here nor there.

Originally this was supposed to be a very simple colour scheme - Rich Razzleberry and Whisper White and nothing else. But much as I love Rich Razzleberry, even I had to admit that there really can be too much of a good thing.

When I ran out of monochromatic possibilities, I remembered this colour combination from a while back - and voila!

Images © 1990-2011 Stampin' Up!®

Supplies used:
Stamp(s): Cottage Garden, Friendly Words Stampin' Around Wheel
Ink: Rich Razzleberry
Cardstock: Pink Pirouette, Rich Razzleberry, So Saffron, Whisper White
Other: Scallop Edge Border Punch, Basic Rhinestones

Monday, August 22, 2011

CAS

What's CAS? That's "Clean And Simple" card styles, a sample of which is shown to the left.

Notice anything ... "new" ... about this card?

What, you mean aside from the stamp set (Creative Elements, soon available from the 2011-12 Idea Book & Catalogue).

Yes, you guessed it, new In Colors!

Shown here is a combination of Island Indigo and Pool Party, available from September 1.

Island Indigo is a sort of teal colour, and Pool Party is a pale aqua, and they look just gorgeous together!

To give you a better idea of the shades, here is a comparison shot showing Island Indigo and Pool Party next to Not Quite Navy and Baja Breeze:

Of course, to really appreciate the colours, you need to see them "in person" so to speak ... contact me if you'd like to know more!

Supplies used:
Stamp(s): Creative Elements
Ink: Island Indigo
Cardstock: Island Indigo, Pool Party, Whisper White
Other: Scallop Trim Border Punch, Basic Pearls

Friday, August 19, 2011

No time to stamp!

I honestly haven't had the time to do much in the way of cardmaking lately :-( and really wanted to get some posts up with projects using retiring stock.

In the meantime, click the links below to have a look at stuff I've made in the past. Hopefully I'll get back to "regular programming" sometime soon!

Priceless
Tart & Tangy (on special at 25% off)
Wonderful Favourites (I highly recommend this set - it was already a bargain, and is now reduced by 25% - AUD29.96 is an exceptional price for a stamp set this large)
Bella Toile
Always
Cheep Talk
Cheers To You
Choo Choo
Eastern Blooms (on special! 25% off!)
Forest Friends

As you can see, some of the sets are a special reduced price, and you really can't knock back a bargain!

Don't forget that all retiring stamps and accessories are only available until August 31, and only while stocks last. Some supplies are already gone for good, and while the ones I've shown above are currently still available, there is no guarantee there will still be stocks through to the end of August.

Monday, August 15, 2011

Colour Inspiration

A new Stampin' Up! catalogue is not only exciting for all the new products it contains, but also the new samples and ideas on every page. This year, inspiration hit me before I had even turned to page 1!

Those of you who are lucky enough to have seen the new catalogue (and it's a beauty) may recognise the colour scheme I have used here. And if you've turned to page 67 you'll see where I got the inspiration for the basic layout of this card.

(Actually, I have used Cherry Cobbler instead of Poppy Parade - so sue me, I looooove Cherry Cobbler).

There was a few moments while making this card when I thought it was going to end up in the bin, but it turned out quite well, don't you think? If I hadn't seen it on the 2011-12 Idea Book & Catalogue, I would never have considered these colours together.

If you haven't seen the new 2011-12 catalogue yet, drop me a line - they are $10 (plus postage and handling) or FREE with a workshop - but remember, the goodies inside are only available from September 1, and you won't see it online until after that date!

Supplies used:
Stamp(s): Cottage Garden
Ink: Peach Parfait, Cherry Cobbler, Soft Suede
Cardstock: Peach Parfait, Soft Suede, Cherry Cobbler, Very Vanilla
Other: Circle Scissor Plus, Scallop Edge Border Punch, Boho Blossoms Extra-Large Punch Square Lattice Embossing Folder, Metallic Brads

Thursday, August 11, 2011

Cutout Butterflies

A couple of months ago, I attended Stampin' Up's annual convention here in Melbourne. One of the highlights of convention is seeing fellow demonstrators present a Workshop Wow on stage - they are all so clever, and we always come away with some nifty little trick to share with out customers.

Kirsty Brown showed us a stunning way to use our Beautiful Butterflies Sizzix die. I would try to explain it, but a picture would do the job way better. Here's my take on her nifty technique:


And a closeup:

I'm not sure if it shows up in the photo, but I spritzed the Bashful Blue butterfly with a Frost White Shimmer Paint spray after embossing it.

Once you have the positioning correct, these double cut butterflies are a snap to make - just ask the ladies I taught it to the other week!

Supplies used:
Stamp(s): Baroque Motifs, Vintage Vogue
Ink: Pear Pizazz, Concord Crush
Cardstock: Conford Crush, Pear Pizazz, Whisper White, Bashful Blue
Other: Beautiful Butterflies Bigz Die, Finial Press Em3/16" Corner Rounder, Basic Rhinestones

Monday, August 1, 2011

Say Goodbye - updated


Okay, I'm back with more information following on from my post this morning.

This morning, Stampin' Up! announced which stamp sets and accessories will be retiring at the end of August 2011. Each day at 8am, SU will update their availability listing, and I will have mine up to date shortly after that for you to check prior to placing your order.

At this stage, availability for all retiring items looks good, although that may change at any moment, and remember, once something's gone, it's gone for good.

Check out my Google Docs spreadsheet here (and please let me know if you have problems with the link), then contact me to place your last chance orders!

Say Goodbye


It's August, and you know what that means! Some stamp sets, cardstocks and accessories are soon to be retiring FOREVER.

I will have a chance to talk more about this later today or tomorrow (it's also the first of the month everywhere else as well, including my "real life" job LOL), but here's a quick link to the Retiring List - have a quick look and see if there's anything there you've had your eye on - grab it now, because once they're sold out, that's it ... no more chances!

And don't forget, a Retirement List means that a new catalogue is only just around the corner :-) I will be placing an order for new catalogues soon - if you want your copy (only $10 each, or FREE with a workshop) contact me today.

Monday, July 18, 2011

The whole thing

As promised the other day, here's the thank you card I sent to my friend last week - it arrived safe and sound :-)

I'm still pretty happy with the result of my first attempt at inlaid embossing (well, second, but we won't talk about the true first attempt, it was pretty pathetic). Using the right embossing folder makes a world of difference - the Square Lattice folder is perfect because it has such a close, intricate design and the edges of your layers barely show at all.

Supplies used:Cardstock: Early Espresso, Very Vanilla, Cherry Cobbler, Peach Parfait, Certainly CeleryOther: Timeless Type Sizzlit Dies, Square Lattice Embossing Folder, Two Step Owl Punch, Two Step Bird Punch

Thursday, July 14, 2011

A little peek

I can't show you the whole card, because it still has to be mailed out to a friend, but here's a little peek at a card I made last night with my NEW toy, the Timeless Type Junior Alphabet for my Big Shot.

This sizzlit die set comes with 12 dies, containing all upper and lower case letters of the alphabet, plus the numbers 0-9 and punctuation, all in a nifty little storage case with room to store half a dozen extra medium sized dies (or, in my case, my smaller standard sized dies which rattle around a little, but hey - they're all in the same place now).

The first thing I wanted to do was try the inlaid embossing technique, where you glue punched or die cut elements to a sheet of cardstock then put it through an embossing folder in the Big Shot. Here I have used the Square Lattice embossing folder (still available, contact me for details) and embossed the greeting right onto the background. It looks as though the letters were printed onto the cardstock - you can barely see that they are actually another layer.

Come back in a few days to see the actual card :-)

Supplies used:
Cardstock: Very Vanilla, Cherry Cobbler
Other: Timeless Type Sizzlit Dies, Square Lattice Embossing Folder

Friday, July 8, 2011

Brighten up winter

Here's a little eye candy to brighten up your dreary winter days ... completely inspired by a project in the monthly publication that Stampin' Up! demonstrators receive (anyone who's seen the original will know which one I mean).

Whereas the original was a beautiful 12x12 scrapbook page with a spray of stamped and punched flowers down one side, I simplified the idea down to a standard (if slightly bumpy) greeting card.

It was a lot of fun to make each flower, trying to be sure and get each one a little different from the next.

Supplies used:
Stamp(s): Party This Way
Ink: Melon Mambo
Cardstock: Peach Parfait, Whisper White, Melon Mambo, Daffodil Delight
Other: 1-3/4" x 7/8" Oval Punch, Decorative Label Punch (Autumn/Winter Mini Catalogue), Itty Bitty Shapes Punch Pack (Carryover Products), Floral Fusion Sizzlit, Blossom Party Sizzix Originals Die, Elegant Lines Embossing Folder, Finial Press Embossing Folder, Basic Pearls, 5/16" Jumbo Brads

Monday, July 4, 2011

Circus, Anyone?

Here's something I made a while back. I was holding off posting a picture because I wanted to try my hand at making a little "steam engine" to pull these cute little carriages - but it's been several months and I'm no closer to working out how I would go about that :-) So if you have any ideas and/or patterns, feel free to let me know!

You can't tell from the picture that these are actually three little boxes, just big enough for a little lolly bag or something similar. The outside of each carriage is half a Top Note die shape, run through the Perfect Polka Dots embossing folder for texture.

Here's close ups of each of the animals ... a little fiddly but so worth it (click for a larger picture):


Supplies used:
Stamp(s): Fox & Friends
Ink: More Mustard, Early Espresso
Cardstock: Old Olive, Real Red, Daffodil Delight, Basic Black
Other:
2"x1-2/3" Oval Punch, 1-3/8" Circle Punch, 1-1/4" Circle Punch, Top Note Die, Perfect Polka Dots Embossing Folder

Friday, July 1, 2011

Free Gift with Purchase!


Do you like FREE stuff? During July, order $100 of product from Stampin' Up! and receive a free ribbon and button bundle! These accessories will brighten up your winter stamping in no time, so contact me to place your order today!


LinkWithin

Related Posts with Thumbnails