Showing posts with label Techniques. Show all posts

Friday, December 23, 2011

A Cardstock Comparison

I'm sure I've posted about this before, but I can't for the life of me recall where it ended up.  Anyway, it bears repeating.

The other day, when I was making my Christmas cards, I was hunting for my stash of Whisper White cardstock (yes, it usually lives in the one place, but I was getting low and thought I might have some squirreled away elsewhere).  I found a handful of white cardstock and naturally assumed it was what I was looking for.

I couldn't have been more wrong, as I discovered when I started to stamp.

Can you see the difference in the picture?

The El Cheapo cardstock is on the left.  The cardstock itself looks very similar to Stampin' Up! Whisper White, but the ink just doesn't soak into the card the same way it does with the SU sample shown on the right.  You can see how patchy the tree looks, especially around the large swirl.


The Whisper White (and Very Vanilla) cardstock from Stampin' Up! have a smooth, smooth, smooth finish which takes ink beautifully.  You might be able to get away with a cheaper card if you are using outline stamps (although, why compromise?), but for bold stamps with large inked areas, you honestly can't go past this stuff.  If you are at all fussy about the finished look of your cards and scrapbooking pages, I can't recommend this highly enough.

You will be pleased to know that I found my hidden cache of Whisper White (and ordered another packet just in case) and my Christmas cards are ink-perfect :-)

Images © 1990-2011 Stampin' Up!®

Supplies used:

Stamp/s: Season of Joy
Ink: Rich Razzleberry

Cardstock: Whisper White, and some cheap stuff I had lying around

Monday, May 17, 2010

Chalky Medallion

I have to say, I am really liking this stamp. I read the other day that it's one of Stampin' Up!'s top sellers in the United States, and I can understand why - it's elegant, big and suits a whole bunch of different occasions.

Here I have used a technique known as Poppin' Pastels (well, that's one of its many names), where you stamp an image in Versamark (a clear, sticky ink), then apply pastels over the top with either an applicator or eye shadow sponge. The effect as you can see is quite soft and kind of fuzzy around the edges, the result of rubbing chalks over the surface of the cardstock. The colour will attach itself best to the sticky Versamark, but will also leave a residue on the cardstock next to the image.

The ribbon ... look closely ... can you tell I didn't have any matching ribbon in my stash, so I had to use Whisper White 1/4" grosgrain ribbon, coloured with a Bashful Blue marker. Piece of cake - if you have white ribbon and a bunch of markers, you can have any colour you want. Just don't get it wet LOL.

I wish the colour was a little better, so you could see just how well the new Melon Mambo goes with Elegant Eggplant, a rich dark purple.

Images © 1990-2010 Stampin' Up!®

Supplies used:
Stamp/s: Medallion Background, Warm Words
Ink: Versamark, Melon Mambo, Elegant Eggplant, Bashful Blue

Cardstock: Bashful Blue, Melon Mambo,
Elegant Eggplant, Bashful Blue, Whisper White
Other: 1-3/4" Circle Punch, 1-3/8" Circle Punch, Whisper White 1/4" Grosgrain Ribbon, Bashful Blue Stampin' Write Marker, Stampin' Pastels

Wednesday, April 28, 2010

Interactive Cards

Sometimes it's fun to make (and receive) interactive cards ... ones that you push, pull, fold or otherwise manipulate.

As soon as I saw this particular stamp (part of the oh-so-sweet "Fox & Friends" from the Autumn-Winter Mini Catalogue), I thought "spinner card".

After all, what monkey can resist twirling around ... and he's just so darned cute!
I used the same layout as this card from a while back, and whipped this up in almost no time at all!

The only stumbling block was that the only circle punch that fit the monkey stamp was my largest 1-3/4" circle, so I had to drag out my new Circle Scissor Plus to make the So Saffron circle to layer it onto. I can see I need a little more practice with that gadget *g*.

The best thing about making spinner cards is they are a snap to make and then you get to play with them for half an hour afterwards!

Images © 1990-2010 Stampin' Up!®

Supplies used:
Stamp/s: Fox & Friends, Circle Circus
Ink: So Saffron, Pumpkin Pie, Chocolate Chip

Cardstock: Pumpkin Pie, So Saffron, Chocolate Chip, Whisper White
Other: Word Window Punch, 1-3/4" Circle Punch, Circle Scissor Plus


And because I liked the monkey so much, I made this card a couple of days later. This little guy fits neatly into the 1-1/4" circle punch.

Images © 1990-2010 Stampin' Up!®

Supplies used:
Stamp/s: Fox & Friends, Vintage Vogue
Ink: Chocolate Chip, Old Olive

Cardstock: Old Olive, Pumpkin Pie, Chocolate Chip, Whisper White
Other: Word Window Punch, 1-1/4" Circle Punch, 1-3/8" Circle Punch, Scallop Circle Punch


Then, I must have been on an owl-frenzy, because I found a pattern for this little guy yesterday and quickly put him together last night. Shame I couldn't find any cute socks, and had to use a pair of mens' business socks *sigh*. But they were clean!

No Stampin' Up! products used, but isn't he so cute!

Saturday, April 3, 2010

Nifty Cut Out Card

I was browsing around the web the other night, and came across this card, which I thought was such a clever idea I had to sit down and try it out.

How fortunate I now have the Big Shot to play with, and a Top Note die.

The technique itself isn't so hard, once you've marked everything up and done it once (my first effort was a disaster - serves me right for not reading and understanding the instructions properly, really). The hard part was working out how to decorate the card once I'd cut it out!

The flower (from Echoes of Kindness, a Level 2 hostess set) was stamped with black Stazon, then watercoloured using an Aqua Painter brush and inkpads.

The right edges of the cut out section were sponged to match the edges of the white piece.


I used the En Francais background stamp across the front (masking off the cut out piece) - because this stamp is narrower than the width of this card, I hid the join with a strip of Perfect Plum cardstock which I ran through the Big Shot with the Top Note die.

Here's another shot of the card from above, so you can see the construction a little better. This won't be the last time I try one of these!


Images © 1990-2010 Stampin' Up!®

Supplies used:
Stamp/s: Echoes of Kindness (Hostess Set), En Francais
Ink: Black Stazon, Pale Plum, Perfect Plum, Old Olive
Cardstock: Pale Plum, Perfect Plum, Old Olive, Whisper White

Other: Big Shot, Top Note Die, 1/4" Old Olive Grosgrain Ribbon, Aqua Painter

Tuesday, March 30, 2010

Easy Easel

At last, I got around to trying one of these Easel Cards out the other night ... and it was "easel"y one of the "easel"iest cards I've made in a long time.

Sorry. Got a bit carried away there, but I'm over it now *g*.

Anyway, this is the card which inspired me to finally make an easel card ... I love how she has used the little flowers from the Trio Flower punch to hold the card up - so clever - so I snaffled the idea for my card.

I put each little flower onto the the foam pad out of the Mat Pack and pressed down in the centre with the end of a pen - this was to shape the flowers a little so they would sit up around the edges and catch the front of the card when it is open.

My version is very much on the "simple" side - I was a bit short on time and space when I made it, so had to stick to the basics, but it was a very easy card to make with a high degree of "wow" in the presentation - my favourite kind of project!

Images © 1990-2010 Stampin' Up!®

Supplies used:
Stamp/s: Inspired by Nature
Ink: Not Quite Navy

Cardstock: Kraft, Not Quite Navy, Whisper White

Other: Trio Flower Punch, Vintage Brads, Mat Pack

Friday, March 26, 2010

Warning - Sunglass Alert!

So this came out a little, um, brighter than I had anticipated (and in real life, it's even more startling). You can't say you weren't warned. And it could have been a lot worse - imagine if I had slipped some Summer Sun in there as well!

Having said that, I really love these colours together. Just have a look at this, the card on the left here and this (well, there's no red in that last one, but just imagine if there was!). You wouldn't think that a pale orange, a bright pink and a lush red would work so well, but *shrug* who am I to argue?

This card was made using something called a "serigraph" technique (you can view a tutorial here). I chose not to use embossing in this piece, as you can see. Ran out of space, really. And I like it without.

Images © 1990-2010 Stampin' Up!®

Supplies used:
Stamp/s: Heartfelt Thanks
Ink: Apricot Appeal, Pixie Pink, Real Red

Cardstock: Pixie Pink, Apricot Appeal, Real Red, Whisper White

Other: Stamp-a-ma-jig, Real Red 1/4" Grosgrain Ribbon

Monday, February 8, 2010

Valentine's Day Cards

I don't think I've ever deliberately set out to make a Valentine's Day card. Even when I made these, that wasn't the original intention - I was just playing around. It wasn't until I was done that I realised *g*.

The idea for the main piece originally came from something that Nicki Tidbold made (I don't think she has those particular cards on her blog, but have a look anyway - she has gorgeous stuff!). She hadmade a beautiful piece of work using reverse masking and made me realise I hadn't done anything like that for ages.

This is the result. I chose to use very neutral colours with the addition of Real Red for a bit of impact, and the hearts seemed to be the right choice in combination with the bird and the script. And that's how they became Valentine's Day cards *g*.

I tried to write a tutorial for masking but it turns out that the Stampin' Up! website has a much better version for you to check out if you're not familiar with this technique. Check it out! And to create a "reverse mask" such as the one I used to stamp the text in the cards above, just cut or tear a hole in scrap paper and stamp through it. Simple!

Images © 1990-2010 Stampin' Up!®

Supplies used:
Stamp/s: Always, En Francais, Simply Said
Ink: Basic Black, Real Red, Basic Gray, Going Gray

Cardstock: Kraft, Basic Black, Real Red,
Whisper White
Other: Eyelet Border Punch, Cutter Kit, Stamp A Ma Jig

Saturday, December 5, 2009

Stampin on Candles

I have to admit, the title of this post is something of a misnomer - but it's the easiest way of describing this technique.

You don't literally stamp "on" the candle, rather you stamp onto white tissue paper (the cheap gift wrapping kind), then use your heat gun to fuse it gently into the wax.

The result is effective and yes, you can still burn the candles, although I would recommend removing any paper, ribbon or "bling" that may be attached.

I was inspired by the lovely Simone Bartrum's presentation on "candle stamping" at the recent Melbourne regional Stampin' Up! seminar (as was just about everyone else in the room). She showed us some simply stunning projects using ideas I had never thought of before - check out her blog, she is super-talented.

Images © 1990-2009 Stampin' Up!®

Supplies used:

Stamp/s: Always, Priceless, Live Like You Mean It, Season of Joy
Ink: Regal Rose, Chocolate Chip, Real Red, Not Quite Navy

Other: Sweet Always DSP, 1/4" White Grosgrain Ribbon, Old Olive Stampin' Write Marker

Tuesday, October 20, 2009

Bright Eastern Blooms

*phew* It's a little dusty here! Yes, I'm still around, however my mojo was taking a break and suddenly it's over halfway through October.

Last weekend, a large number of excited Stampin' Up! demonstrators from around Victoria flooded into the Crown Promenade Hotel in Melbourne to attend a regional training session. We spent six hours listening to inspiring presentations, seeing some "wow" demonstrations and making projects with the stamp set and supplies kit provided to us.

I can't show you the stamp set yet - for that you will have to wait until next month, as it won't be available for purchase until the Summer Mini is released later this year - and I didn't make any swaps so really there's not much to see here LOL. You can take a quick trip over to my dear friend Pauline's blog and see the swap she made - they were very popular, and she ran out by the first break!

However I did come away from Regionals with a new enthusiasm, and last night had a play with an old favourite stamp set, Eastern Blooms. Here's one of the cards I came up with.

I really like this colour combination (which I've used in the past, here). Who would have thought that Apricot Appeal, Pixie Pink and Real Red would work so well together?

The flowered branches are stamped a few times in Versamark on Whisper White cardstock, then clear embossed. To apply the colour I used a brayer (a rubber roller), inking the lower part of the card in Apricot Appeal and the upper with Pixie Pink (overlapping in the middle to blend the two colours), finally sponging a little Real Red along the top.

The embossing resists the ink so the Whisper White cardstock shows through on the branches.

I chose to use Whisper White rather than Glossy White (which I would normally use for brayering) because I like the soft look that it gives when it's brayered with colour. A while back a friend and I experimented with different, competing brands of white cardstock, and found that the Stampin' Up! Whisper White (and Very Vanilla) produce the best result, due probably to their ultra-smooth matte finish.

A quick heads up, too ... don't forget that the items in the current Spring Mini are only available for another six or so weeks - and that includes the Scallop Oval Punch shown here! Contact me today and snap it up while you can!

Images © 1990-2009 Stampin' Up!®

Supplies used:

Stamp set/s: Eastern Blooms, Big Bold Birthday
Ink: Apricot Appeal, Pixie Pink, Real Red
Cardstock: Pixie Pink, Apricot Appeal, Real Red, Whisper White

Other: Brayer, Clear Embossing Powder, Large Oval Punch, Scallop Oval Punch, Wide Oval Punch

Thursday, August 20, 2009

Attempting Faux Embossing

I have seen stunning examples of this technique (at Felicity's blog, for a start), and would love to say that my attempts were wildly successful, but so far I'm not 100% happy with the results.

However, this card which I made recently came kind of close to the effect I was after.

Faux embossing is a technique whereby you stamp an image in white, then (a Stamp-a-ma-jig is essential for this) stamp again a fraction of a centimetre off to one side in a dark ink. The result is supposed to trick your eye into seeing a slightly raised image, as if it was embossed.

The photo here doesn't really show the effect very well, sadly, and I have seen much better samples, but I like the colours and layout of this card enough to show you how it came out.

Originally I tried the overstamping in Real Red ink to match the cardstock, but for some reason it came out an odd burgundy colour over the top of the Whisper White ink, so I redid it with the Chocolate Chip - much better.

Images © 1990-2009 Stampin' Up!®

Supplies used:

Stamp set/s: Always

Ink: Whisper White Craft, Chocolate Chip

Cardstock: Chocolate Chip, Real Red, Basic Black, Kraft

Other: Stamp-a-ma-jig, Always in Bloom Standard Wheel

Wednesday, August 5, 2009

An unusual fold

You have to agree that this look is a bit different from your run-of-the-mill greeting card.

I followed instructions on Mae Collins' blog to create these cards which came out pretty much as I had imagined (very unusual occurrence *g*). For the purposes of the test run I grabbed out a stamp set that has been somewhat neglected of late - One of a Kind - because the design of these stamps is perfect for that "all over" floral look I was going for.

Still lovin' this Pacific Point blue! It is so strong but I still don't find it overwhelming.

Here is a small picture of one of the cards laid out flat - as you can see there is room for a greeting behind the front panel without detracting from the look of the card as it stands up.

Now I need to find (or make) an envelope to fit these cards in! Didn't think of that, doh!

Images © 1990-2009 Stampin' Up!®

Supplies used:

Stamp set/s: One of a Kind
, Always
Ink: Pacific Point
Cardstock: Pacific Point,
Whisper White
Other: 1-1/4" Square Punch, 1-3/8" Square Punch

Saturday, July 11, 2009

Using Markers

I'm sure you're aware you can use markers to ink up your stamps. Most water based markers will do the job, although brush tipped markers like the Stampin' Up! Stampin' Write Markers are ideal as you can use the side of the brush tip to ensure a more complete coverage.

I finally got my own set of Inspired by Nature a month or possibly more ago and immediately set to work stamping with it. I coloured the flowers in with Summer Sun, Ruby Red and Old Olive markers, then spritzed it ever so lightly to blend the colours a little and give it a watercolour look (a tip: If you don't have a squirty bottle with a fine spray, you can spray it into the air and sort of "catch" the drops on the stamp - kind of like how you're supposed to "walk into" your perfume *g*) and stamped it on Very Vanilla.

Then my sample piece sat in my craft trolley for a while. A long while.

Until last Saturday when I finally used it to create this finished product. I stamped the grass in Old Olive on Old Olive cardstock to create the background layer. Love that grass stamp!

Images © 1990-2009 Stampin' Up!®

Supplies used:

Stamp set/s: Inspired by Nature

Ink: Old Olive

Cardstock: Summer Sun, Old Olive, Very Vanilla
Other:Wide Oval Punch, Stampin' Write Markers in Summer Sun, Ruby Red and Old Olive, Stampin' Sponges

Friday, March 6, 2009

Embrace Life

No, I still haven't bought this set *sigh* ... I really want to but can't justify it at the moment - with a bunch of bills sitting on the kitchen bench and yelling at me every time I go past, I am having to be strong *g*.

So Embrace Life, currently available in the Stampin' Up! Summer Mini might end up being one of those sets I never buy. Unless (and I have my fingers and toes crossed here) it makes it into our next catalogue - due out on April 1. I might even be able to afford it in a few months' time LOL.

In the meantime, I have borrowed my friend's set again and made these.

I was playing with reinkers the other day (see my previous post) and was showing a friend the kinds of things you can do with them. If you don't have any rubbing alcohol and metallic reinkers, you can still make a stunning background with a damp cotton wool ball (or makeup sponge, or baby wipe) and a few drops of ink, dabbed randomly onto a piece of white glossy cardstock.

The first card here was created using exactly that method. I liked it so much I didn't want to cover it up so just stamped the single flower over the top in Stazon, trimmed and there it is. You might just be able to make out the stamped images on the Rose Red cardstock as well, just for a bit of texture.

Supplies used:

Stamp sets: Embrace Life

Ink: Black Stazon, Pretty in Pink, Rose Red
Cardstock: Pretty in Pink, Basic Black, Rose Red, Glossy White
Other: Pretty in Pink 1/4" Grosgrain Ribbon, Classic Ink Reinkers in Pretty in Pink and Rose Red

The second card was a quick experiment to see what it would look like if I stamped the flower onto the prepared glossy cardstock and cut it out.

Turned out it looked good!

I borrowed the layout from the cards at Stamping with Hulda; I was really taken with the simple elegance of the design and knew it would work with this stamp as well.

I've popped the flower up on a dimensional just to separate it a bit from the rest of the card.

Supplies used:

Stamp sets: Embrace Life

Ink: Black Stazon, Pretty in Pink, Rose Red
Cardstock: Pretty in Pink, Rose Red, Whisper White, Glossy White
Other: Pretty in Pink 1/4" Grosgrain Ribbon, Classic Ink Reinkers in Pretty in Pink and Rose Red, Stampin Dimensionals

Tuesday, March 3, 2009

Playing with Fish again

I have quite taken to Ocean Commotion. At first I knew I had to have it, but didn't know what to do with it once it was here. I am now finding that there are things that I can do with it, and the Polished Stone technique background was one of them.

Have you seen this technique? Basically you put on a pair of disposables gloves (trust me on this), saturate a cotton ball or makeup sponge with rubbing alcohol, drop a couple of drops of dye reinkers in coordinating colours onto it and a drop or two of metallic (Encore in this case) reinker and dab all over a piece of glossy white cardstock.

The alcohol makes the metallic ink sort of run around the cardstock in a random fashion and the effect is quite pretty and not a little like a quartz stone with a vein of metal running through it.

Anyway, after reading a discussion about Polished Stone on a mailing list I'm on, I realised it had been a long time since I did this myself, and voila, here it is.

You can't actually see the silver streaks running through the fishy background in this photo, and it really is incredibly subtle even in real life.

An idea that I have borrowed from a blog I was visiting the other day (Karen Thomas' Luv To Stamp - lovely work there!) was to use my Crop-A-Dile to emboss dots for the bubbles, then I used a little Two Way Glue to stick some Dazzling Diamonds glitter onto them.

Supplies used:

Stamp sets: Ocean C
ommotion
Ink: Black Stazon
Cardstock: Basic Black, Certainly Celery, Bashful Blue, Not Quite Navy, Glossy White
Other: Scallop Edge Punch, Crop-A-Dile, Two Way Glue, Dazzling Diamonds Glitter, Classic Stampin' reinkers in Certainly Celery, Bashful Blue and Not Quite Navy

And an update: A few days ago (well, maybe a week or so) I posted this card, which was a little unfinished at the time. I have since had another look at it and used some advice from Pauline to finish it a off bit better.

Thanks Pauline!

Supplies used:

Stamp sets: Ocean Commotion
Ink: Real Red, Ballet Blue, Pumpkin Pie

Cardstock: Ballet Blue, Pumpkin Pie, Real Red, Basic Black, Old Olive, Whisper White
Other: 1-1/4" Square Punch, 1-3/8" Square Punch

Tuesday, February 17, 2009

Afternoon at Gail's

On Sunday I was lucky enough to go to Gail's house to take part in a fundraising Stamp-A-Stack. Not heard of a Stamp-A-Stack? Basically, it's exactly what it sounds like ... for a fee, you get to make ten cards (five each of two designs) - no cutting or preparation involved (well, not for the guests anyway *g*), just an afternoon of stamping a stack of cards.

Gail is running a few of these Stacks over the next few weeks with all proceeds going to the Victorian Bushfire Appeal ... I have heard that the response was terrific and all the spots are now booked out so I'm glad I got to go!

So, what did we make?

Well, this first is using my current fave, Eastern Blooms. I got to use the crimper (available in the Stampin' Up! catalogue) for the first time, and enjoyed it, which surprised me. It's a lot bigger than I thought, too, you could fit a whole card front in there if you wanted. As you can see, we've run a Close to Cocoa inkpad over the top to emphasise the dimension on the main panel.

Gail's design had a word on it, but I couldn't decide so just left the card blank ... I can always add something later when I need to.

Supplies used:

Stamp sets: Eastern Blooms
Ink: Close to Cocoa
Cardstock: Tempting Turquoise, Close to Cocoa, Chocolate Chip, Naturals Ivory
Other: Crimper, Tempting Turquoise Grosgrain 1/4" Ribbon, Stampin' Write Markers in Chocolate Chip and Pixie Pink


The second card uses a set I don't have but might need to buy now that I've used it ... we used Versamark to stamp the horse and word on glossy white cardstock, then brayered Close to Cocoa ink over the top. The areas with Versamark (and occasionally fingerprints) "resists" the dye ink and shows through as a sort of ghostly image ... very effective!

I like the brown/red/black combination - very masculine.

Supplies used:

Stamp sets: Wanted
Ink: Versamark, Close to Cocoa, Whisper White Craft
Cardstock: Real Red, Basic Black, Glossy White, Chocolate Chip, Close to Cocoa

Other: Brayer, Vintage Brads, Photo Corners Punch

So thanks to Gail for a fun afternoon (and waves to Sharon, Liz and Pauline) and I hope you raise a bunch for the bushfire appeal!

Saturday, January 24, 2009

Getting the most of your Chalks

Recently a few girls from Gail's downline met up at Eildon for a stamping weekend (waves to Anne-Marie, Coral and Gina). We had a great time - the location was tranquil, except for the motorbikes down the road, the weather was perfect, even the mossies weren't too friendly.

While we were there, we actually managed to do a little stamping (!!!). Shown to the right is the table during our Sunday morning session - this is a whole bunch tidier than it was the night before!

Aside from making up some little notepads (so easy to cover with a little cardstock and then decorate with punches & stamps!) I whipped up this. I stamped with white craft ink onto Basic Black cardstock, then used my Stampin' Pastels to colour in the flowers. Originally I coloured the entire petal area red, then tried one with blue, then tried Gina's suggestion and coloured just the tips of the petals blue ... bingo! That was the winner.

So I did the same thing with the tiny flowers and the butterfly to fill in the space on the right of the card.

I really, really like this one!

Supplies used:

Stamp sets: Live Your Dream
Ink: Whisper White Craft Ink
Cardstock:
So Saffron, Old Olive, Certainly Celery, Basic Black
Other: Stampin' Pastels

Tuesday, November 18, 2008

Christmas Inspiration

I was blurfing (yes, of course you know what that means ... you're doing it now! Blog surfing, that is) earlier and decided to visit the very talented Marelle Taylor's blog over at thINKspot. Her stuff is simply gorgeous *sigh*. Anyway, I was taken by the card on this post and, because I am actually supposed to be doing something completely different, ended up making this instead.

This is just so easy it's almost embarrassing *g*.

I have a small stash of old copper coins and 1c pieces are the exact right size for this technique. Once I run out of 1c bits, the cards will become 8c dearer to make after I switch to using 5c pieces.

I wonder if I could churn a few of these out for my family Christmas cards this year ...? These spinner cards are so much fun to play with, almost hypnotic. Try one and see!

Images © 1990-2008 Stampin' Up!®. Contact me if you wish to order any of the supplies used to make this card.

Supplies used:

Stamp sets: Baroque Motifs, Party Punch (hostess)
Ink: Old Olive, Real Red

Cardstock: Whisper White, Old Olive, Real Red

Other: Word Window Punch, 1/2" Circle Punch, 1" Circle Punch, 1-1/4" Circle Punch, Scallop Circle Punch, Scallope Edge Punch

Monday, October 27, 2008

A Christmas card

I seem to be obsessing about this a bit lately, probably because making your own Christmas cards, while a noble pursuit which makes you feel awfully proud of yourself when it's all done, is a lot of work and can take quite some time to do (depending on how many you've got to make).

So with that in mind the last couple of workshops I have done have had a Christmas card theme throughout - trying to get everyone started early *g*.

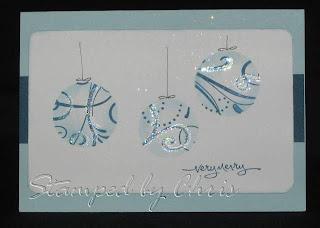
This is a card I demonstrated at a workshop on Saturday (waves to Sue & friends!) which is super easy and very effective. Here I have used 2 Way Glue to add some sparkle to the baubles, because doesn't glitter just say Christmas?

How do you achieve this effect? Easy! Just punch some random circles in a scrap of cardstock, lay it onto your white piece and run a Stampin' Around Wheel over the top, then sponge a little co-ordinating ink around the edges. Chuck out your mask and add lines freehanded with the narrow end of a Stampin' Write marker for strings and there you have it - Christmas baubles!

I used the little "very merry" stamp from the Short & Sweet set (one of the ones on special this month) - a handy little set to have as it has six phrases for different occasions, and little images to match each one. It's so cute!

Here's a closer picture of the baubles. I love how it came out!

Images © 1990-2008 Stampin' Up!®

Supplies used:

Stamp sets: Short & Sweet
Ink: Not Quite Navy, Soft Sky
Cardstock: Soft Sky, Not Quite Navy, Whisper White

Other: 1-3/8" Circle Punch, 1-1/4" Circle Punch, So Swirly Stampin' Around Jumbo Wheel, Jumbo Stampin ' Around Handle, 2-Way Glue Pen, Dazzling Diamonds, Sponge Daubers

I am in the process of making Christmas cards for our customers at my "real" job ... luckily it's a relatively small business, but that's still about 80 cards - *argh* what was I thinking? When I get them all done I will take a photo to share. I hope the customers appreciate them ...

Tuesday, August 5, 2008

Just a little something

I was suddenly inspired last night and ended up with this ... the background is stamped with black Stazon then dusted with Real Red and Pretty In Pink Stampin' Pastels. I used the rubber from the Pastels set to remove the colour around the hearts - pretty nifty that the rubber in the set actually does that! Try rubbing out coloured pencils like that!

I also used Stazon to stamp the ribbon - how nifty is that? Lovin' that So Many Sayings hostess set, the phrases fit in the Word Window punch and now I find they fit on the 1/4" ribbon as well!

Images © 1990-2008 Stampin' Up!®

Supplies used:

Stamp sets: Time Well Spent, So Many Sayings
Ink: Black Stazon, Purely Pomegranate

Cardstock: Whisper White, Purely Pomegranate, Basic Gray
Other: Pretty in Pink 1/4" grossgrain ribbon, blender pens, Stampin' Write Markers,Stampin' Pastels, Corner Rounder Punch.

Saturday, July 5, 2008

Curly Brackets

Okay, I did mention a while back that I would have to quickly show you how to use the Stampin' Up! Round Tab Punch to create little curly brackets, and finally here it is! With thanks to my daughter who took the photos.

First punch out a Round Tab, and put it aside - you can use it to make a bookmark or something later.


Then (holding the punch upside down so you can see where you're punching), slide the punch over about three millimetres and punch again.


Do this a few times. You will have some little punchies that look kind of like bats (well, they do to me ... perhaps I need to get out more).


Now simply trim the "wings" off and there you are!


Another reason why you need to have this punch. It is, of course, invaluable for labelling your files (I punch tabs out of sticky paper for this), or a tab at the top of a bookmark (note to self: post a bookmark to the blog). And yesterday, some creative friends of mine came up with a couple of new ideas for this punch as well, which I will have to show you another time.

LinkWithin

Related Posts with Thumbnails